How to Photograph Plus-Size Clothing: A Step-by-Step Guide for E-commerce Sellers


Plus-size apparel makes up roughly a fifth of the global women's clothing market, yet plus-size shoppers are still the group most likely to say that product photos don't match what arrives at their door. The gap usually isn't about clothing itself — it's about how clothing was shot. Lighting that flattens curves, angles that distort proportions, and models who don't represent the actual customer all chip away at trust and drive up returns.
This guide walks through the full process of photographing plus-size clothing for an online store, from planning the shoot to editing the final images, with practical steps you can use whether you're working with a professional model, a mannequin, or your own smartphone.
Key Takeaways
Fit is the story: Plus-size product photos must communicate fit and drape accurately — shoppers can't try the garment on, so product photography acts as an important part of the online fitting experience.
Soft, directional light wins: A diffused key light slightly above eye level, plus a gentle rim light, flatters the garment and the model without harsh shadows.
Angles matter more than gear: Shoot from slightly above eye level with a 50mm or longer lens, and pose with weight shifted and arms away from the body — these cues make every fit read better.
Model size equals customer trust: Using your real target size builds purchase confidence and is now the mainstream norm for size-inclusive brands.
Know your platform rules: Amazon’s main-image requirements vary by category and marketplace. Check the current Seller Central guidance for your specific apparel category.
Start with one garment: Pick your best-selling plus-size SKU, run the full 7-step process on it, and refine before scaling to the whole catalog.
Why Photographing Plus-Size Clothing Deserves Its Own Playbook
Generic clothing photography tips don't transfer cleanly to plus-size garments. Fabric drape, proportion, and fit behave differently at different sizes, and a small misstep in angle or lighting can exaggerate or flatten the silhouette in ways that cost you sales — or worse, trigger returns from shoppers who felt misled.
Here's what makes plus-size product photography a distinct discipline for online sellers:
Fit is the highest-stakes information. Shoppers buy with their eyes, and for many plus-size shoppers, an important question is whether the garment will fit and drape as expected. Photos that show accurate drape, stretch, and proportion answer that question before checkout — and greatly reduce the expensive return after delivery.
Size-inclusive imagery is the new baseline. Use a fit model whose measurements and size are close to the target customer and the garment sample. If the range is broad, consider using multiple fit models and clearly disclose each model’s measurements and the size shown.
Platform rules are specific. Amazon requires clothing main images to show the garment on a human model, front-facing, on a pure white background, with the product filling at least 85% of the frame. Ghost mannequins and AI-generated people have their own restrictions.
✅ Recommended: Treat size inclusivity as a product decision, not a "nice-to-have." A consistent fit model in your target size range does more for trust and reduces return rates than any lens or filter.
What to Prepare Before You Photograph Plus-Size Clothing
Before taking good photos of plus-size clothing, you need to be well prepared. Here is the main preparation list:
Category | Details |
Garment |
|
Model Strategy |
|
Camera and Lighting Kit |
|
💡 Pro tip: If you're shooting with a phone, raise it to chest height or slightly above the model's eye level, and never use the ultrawide lens for full-body shots — it distorts proportions at the edges.
How to Photograph Plus-Size Clothing: 7 Steps That Sell
Step 1: Set Up Soft, Directional Lighting
Place your key light slightly above eye level and aimed slightly downward — this is the most flattering angle for faces and body lines.
Diffuse the light. Use a softbox, umbrella, or even a white sheet. Hard light creates harsh shadows that can exaggerate areas shoppers shouldn't be distracted by.
Add a rim or strip light from the side (behind the model) to sculpt the silhouette and separate the body from the background. A vertical strip box is a classic trick for defining an hourglass shape.
Check the shadows on the bust, hip, and waist before the first shot. Adjust light positions until shadows are soft and directional, never harsh.
Step 2: Choose Angles and Lenses That Flatter
Shoot from slightly above the model's eye level. Low angles exaggerate proportions and are the most common rookie mistake in plus-size photography.
Use a 50 or higher lens and step back. Longer focal lengths slightly compress the image, which reads as a more natural proportion. Learn Photography's guide to photographing plus-size subjects breaks down this angle-and-lens logic in detail.
Frame the full silhouette — from just above the head to below the hem — for the main shot, then crop in for details.
Keep the camera level. Tilting up or down changes the perceived proportions; keep the sensor plane parallel to the floor.
Step 3: Direct Poses That Showcase Fit and Drape
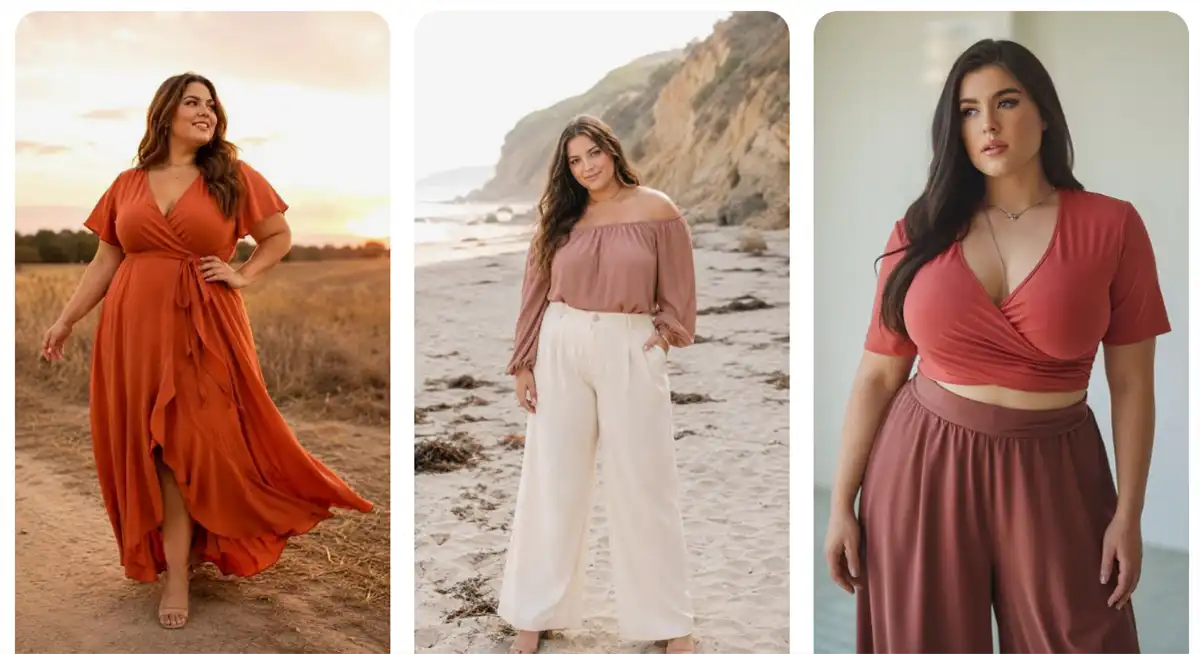
Shift weight to one leg and bring the other foot slightly forward — this elongates the body and creates a dynamic line.
Keep arms slightly away from the body, with a hand on the hip and the elbow slightly back. Pressed arms flatten the torso and hide the garment's shape.
Angle the body 45 degrees toward the camera while keeping the face toward the lens — this creates depth and a defined silhouette.
Fix posture: shoulders back, chin slightly forward and down to sculpt the jawline, neck lengthened.
Add movement shots to show how the garment flows and moves on a real body. For more pose variations, Table & Spoon's plus-size posing guide is a handy on-set reference.
💡 Pro tip: Show the model the last shot after each pose change. Positive feedback loops keep energy high and produce far more natural expressions than directing blind.
Step 4: Shoot the Full Multi-Angle Set
Capture front, back, and both sides — shoppers flip through angles like a virtual fitting room.
Add close-ups of fabric texture, seams, buttons, and hardware. These details answer quality questions and reduce "it looked different in person" returns.
Shoot the fit-critical zones: waistband, hem, sleeve length, and stretch panels.
Keep framing and lighting consistent across every angle — use floor marks and a tripod. Inconsistent shots make a listing look unprofessional.
Step 5: Add Short Fit and Movement Clips
Shoot a 10–20-second video of the model turning front to back, sitting and standing, and walking a few steps.
Display the fabric stretch, recovery, and real-world movement, which are among the most trustworthy signals for plus-size shoppers deciding whether the garment will work for their body.
Use the clips in listings, social posts, and ads. Video content is also a strong engagement signal on platforms like TikTok Shop and Instagram.
Step 6: Edit for Accuracy, Not Distortion
Color-correct to the garment's true color. Shoot a gray card at the start of the session and use it as the white-balance reference.
Remove wrinkles, dust, and distractions — not body shape. Over-retouching that visibly changes the model's proportions destroys trust.
Keep proportions honest. The garment should look exactly like it does in person.
Batch-edit for consistency: same white balance, same crop, same brightness across the whole set and across the catalog.
Step 7: Check Platform Requirements Before Uploading
Amazon main images: Ghost mannequin (invisible mannequin) images or high-quality flat-lay photography, pure white background (RGB 255,255,255), product filling at least 85% of the frame, no text, logos, or watermarks. Aim for at least 2,000*2,000 pixels on the longest side for zoom quality. You can check the full Amazon product photo requirements to ensure accuracy.
Alternate images: Up to 9 per SKU — use them for back/side views, fabric close-ups, and on-body detail shots.
AI-generated people disclosure: Platform rules for AI-generated people and synthetic content can vary by marketplace, content type, and region. Check the current Amazon and TikTok Shop policies before publishing AI-generated images or videos, and disclose synthetic content where required.
⚠️ Warning: Fully synthetic main images that misrepresent the product can trigger listing suppression. Simple edits (background removal, color correction) don't need disclosure — but photorealistic AI people in images do. When in doubt, disclose.
Photo Options Compared: Live Model vs. Ghost Mannequin vs. AI-Generated Models
| Method | Cost per image | Turnaround | Fit realism | Limitations | Best for |
| Live model shoot | ~$200+ per final image (typical mid-tier shoot) | 2–6 weeks including casting and editing | Highest — real drape, movement, trust | Expensive; representing multiple sizes multiplies cost | Hero products, brand campaigns, Amazon main images |
| Ghost mannequin | ~$25–75 per image | Hours to days | High for structure, but no human body | Can't show real-body drape | Structured garments (blazers, shirts, knitwear) |
| Flat lay | Lowest (hours of work) | Hours | Low — no fit or drape info | Least engaging; doesn't answer fit questions | Budget restocks, secondary images, quick colorways |
| AI-generated model visuals | ~$0.05–5 per image | Minutes | High — controllable body sizes and poses | Quality varies with fabric complexity; disclosure required on Amazon/TikTok Shop. | Scaling size-inclusive on-model visuals, alternate images, campaigns, social and video |
Each method has a legitimate place. Live shoots are the gold standard for trust, ghost mannequins shine for structured garments, flat lays cover the low-budget basics, and AI-generated model visuals are the fastest way to show one garment on various body types. It's better to choose your preferred type according to your real needs and budget.
Which Photography Method Fits Your Workflow?
| Scenario | Recommended method | Why |
| Launching a 50-SKU plus-size collection on a limited budget | AI-generated model visuals | On-model visuals for every size in minutes, at a fraction of photoshoot cost |
| One hero product where fit is everything | Live model shoot | Highest realism and trust; worth the cost for flagship SKUs |
| Structured blazers, shirts, and knitwear at scale | Ghost mannequin | Clean, consistent shape without model logistics |
| Frequent restocks and new colorways | Flat lay + AI try-on | Fast iteration; upgrade top sellers to on-model visuals later |
📌 Note: Whatever method you choose, consistency across the catalog matters — the same background, lighting, and model (or model type) make your brand look established and make size comparison easier for shoppers.
Beyond the Photoshoot: Scaling On-Model Plus-Size Visuals Without a Camera
Here is the reality for most small and mid-sized brands: hiring multiple plus-size models to represent different body shapes (e.g., pear, apple, hourglass) for every single SKU is financially impossible. This is where Koozee changes the economics of size-inclusive photography.
For plus-size clothing sellers, you can just upload the garment photo you already have — a flat lay, hanger shot, or a single try-on image — and generate on-model visuals with AI, including different body sizes and poses. It also handles fitted and intimate apparel try-ons that generic AI tools often restrict, changes models, scenes, and postures, and turns product photos into listing-ready videos and viral-style product clips for Shopify, Amazon, TikTok, and ads.
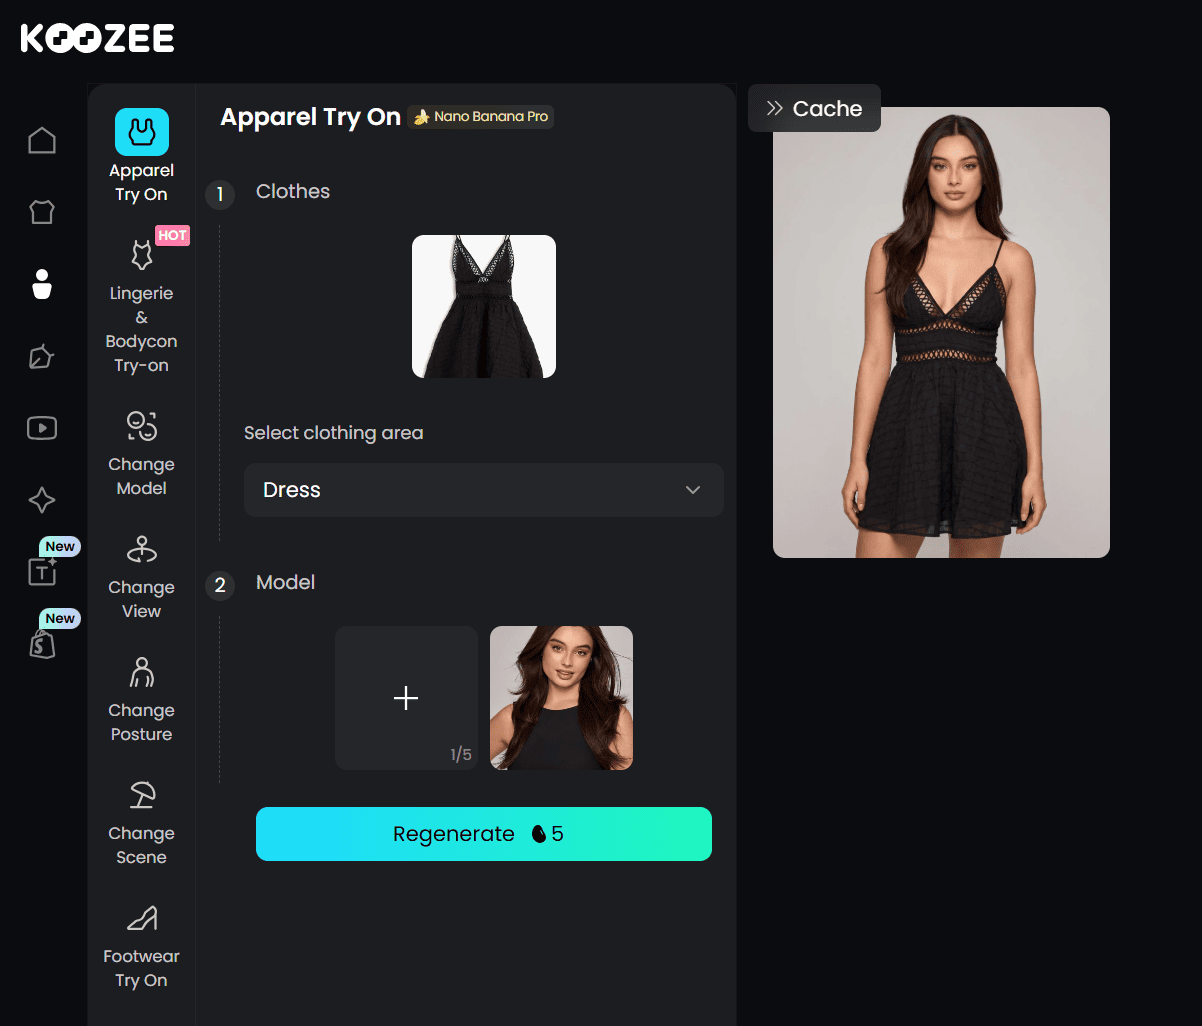
The Shopify Workspace Advantage: For Shopify sellers, Koozee connects directly to your store. You can pull an existing product image, generate diverse on-model visuals and fit-check videos, preview the results, and publish them back to your listing without the endless download-and-upload cycle.
Lingerie & Intimates Safe-Zone: If you sell plus-size intimates, swimwear, or bodycon dresses, Koozee's specialized engine handles tight-fitting garments without triggering the frustrating "NSFW" content blocks common in generic AI tools.
✅ Try Koozee with 30 free credits: Start with one plus-size garment photo you already own and generate your first AI model visual — no photoshoot required.
FAQ
What's the biggest difference between photographing plus-size and straight-size clothing?
The core photography principles — soft light, correct lens distance, consistent editing — are the same. The difference is in what shoppers are looking for: proof of accurate fit, representative model sizing, and confident, natural posing rather than concealment.
What size model should I use for plus-size clothing photos?
Use a model in size 16–18, or the closest available size to your target customer's average. Many size-inclusive brands use two fit models to cover a range. Disclosing the model's size and the garment's size in the listing helps shoppers map the fit to their own bodies.
What is the best lighting for plus-size product photography?
Soft, diffused light slightly above eye level — from a softbox, diffuser, or a window — with a gentle rim or strip light from the side to define the silhouette. Avoid harsh, direct lighting that throws unflattering shadows on the bust, waist, and hips.
Do Amazon product photos for plus-size clothing require a live model?
Not always. Many categories accept mannequin, ghost-mannequin, or flat-lay images, though model shots are recommended (and sometimes required) for certain apparel categories to show fit and drape.
How do you make plus-size models feel comfortable and confident in front of the camera?
Communicate the shot list in advance, give clear and positive direction, keep the atmosphere relaxed (music helps), take breaks, and never over-correct. Showing the model the photos as you go builds trust — comfort always shows up in the final images.
Is it okay to edit plus-size clothing photos?
Yes — for color accuracy, background cleanup, and wrinkle removal. Don't edit to change body proportions; accurate representation builds trust and reduces "fits differently than pictured" returns. Over-retouching is one of the fastest ways to lose a size-inclusive audience.
Can AI-generated models work for plus-size clothing listings?
Yes, Many platforms may permit AI-generated model imagery, but requirements vary by marketplace, category, region, and whether the image accurately represents the product. Check the current rules before publishing and disclose synthetic content where required.
How many photos does a plus-size clothing listing need?
Aim for 5–8 images: main on-model shot, back and side views, a fabric/texture close-up, a fit-detail shot (waistband, hem, stretch), and ideally a short video showing movement and fit. More angles mean fewer fit surprises — and fewer returns.
You May Be Interested

9 Best AI Fashion Model Generators for E-commerce (2026)
7 Best Fashion Video Generators for Ecommerce Brands in 2026

6 Tips to Take Good Photos for Depop 2026
