How to Take Good Photos for Depop: 6 Tips That Actually Help You Sell Clothes


Known as a dynamic blend of a social media network and a thrift shop, Depop is a visual-first marketplace where Gen Z and millennial shoppers hunt for vintage gems, Y2K fashion, and unique streetwear. Because the platform relies heavily on an image-centric, grid-style feed where titles and prices are hidden until clicked, your visual presentation is everything. If you want to stand out from thousands of daily uploads and capture a buyer's attention, your listing's thumbnail photo is your best chance to earn a tap.
Whether you are figuring out how to sell on Depop for the very first time or scaling an established resale shop, mastering your visual workflow is the secret to driving more clicks and faster sales. This guide breaks down exactly how to take good photos for Depop, from lighting basics to advanced AI visual production that saves you hours of time and money.
Key Takeaways
Use natural & soft light: The single most impactful change you can make is moving to natural, indirect light to improve photo quality.
Flat lay vs. modeled shots: Flat lays are easier and more consistent, but modeled shots can increase the likelihood of a sale, according to seller communities.
Consistency builds trust: Keeping the same lighting, background, and editing style across your listings helps your shop look more professional.
Depop crops to square: Always shoot in 1:1 aspect ratio or leave extra space around your item so the platform's automatic square crop doesn't cut off important details.
AI tools can bridge the gap: If you can't model clothes yourself or hire a photographer, AI visual tools can turn flat lay photos into models and clean backgrounds from simple flat product shots.
Why Your Depop Photos Make or Break a Sale
Depop is a visual marketplace. Unlike eBay or Amazon, where buyers often search by keyword and compare specs, Depop users scroll through an image-heavy feed. Your cover photo has maybe two seconds to earn a tap.
Consider how the platform works:
The main feed shows a grid of square cover images — no titles, no prices until you tap.
Listings with four well-shot photos get more engagement than those with one or two.
Buyers associate photo quality with seller reliability. Blurry, dark, or cluttered photos signal that the seller may not care about the item — or its condition.
📌 Note: Depop allows up to four photos per listing. Always use all four slots. Front, back, detail shot, and a tag/label close-up is the minimum recommended combination.
Depop Listing Photo & Video Requirements
| Requirement Category | Technical Specification | Best Practice & Guidelines |
| Aspect Ratio | 1:1 (Square) | Always compose shots in square mode or leave extra breathing room so Depop's automatic crop doesn't cut off key details. |
| Recommended Dimensions | 1280 × 1280 px (Minimum: 1080 × 1080 px) | Upload high-resolution images to prevent pixelation when buyers zoom in to inspect fabric details and condition. |
| Photo Upload Limit | Up to 4 photos per listing | Use all 4 slots: 1. On-model cover shot / full item shot, 2. Back view, 3. Label/size tag close-up, 4. Texture, details, or flaws. |
| Video Upload Limit | 1 video per listing (Up to 60 seconds) | Show garment movement, drape, fit check, or a 360° view to answer buyer sizing questions before they ask. |
| File Format | JPG, PNG, WEBP | Standard mobile camera image formats are supported seamlessly on iOS and Android uploads. |
| Copyright Policy | 100% Original Photos Only | No stock photos allowed. Using images taken from brand websites or third parties violates terms and risks listing removal. |
| Lighting & Exposure | Natural, Indirect Light | Shoot near a window (perpendicular angle) between 10 a.m. and 2 p.m. to avoid harsh direct glare and heavy shadows. |
| Color & Editing | True-to-Life Color Accuracy | Adjust camera exposure/white balance to reflect real-world garment colors; avoid heavy filters that misrepresent the item. |
The most common photography complaint on Depop seller forums is bad lighting — grainy images, yellow tints, harsh shadows that distort colors and make items look worse than they actually are. The fix is simpler than most sellers think.
Why Natural Light Works
Natural daylight has a full color spectrum that most indoor bulbs can't replicate. It renders fabric colors accurately and creates soft, even illumination that minimizes texture distractions. But direct sunlight is too harsh — it creates blown-out highlights and deep shadows that hide detail.
How to master natural indirect light for Depop product photos:
Step 1. Choose the Right Time and Window
Shoot near a large window with bright, indirect sunlight between 10 a.m. and 2 p.m. Overcast days are ideal, as clouds act like a natural softbox to give you perfectly even lighting.
Step 2. Position for Side Lighting
Place your setup perpendicular to the window so the light hits your item from the side. This creates gentle shadows that highlight the garment's fabric texture and add depth.
Step 3. Balance and Soften Your Light
If the sun is too harsh, hang a thin white sheet over the window to soften it. Then, prop up a white foam board on the opposite side of the garment to bounce light back in and fill any dark shadows.
💡 Pro tip: If you're shooting in a room, white walls are ideal. If that's not an option, position your item as close to the window as possible to minimize wall bounce.
Best for: Sellers with daytime availability who want a zero-cost, immediate upgrade. Works for flat lays, hanging items, and modeled shots.
2. Set Up a Clean, Consistent Background
After lighting, the background is the second thing buyers notice — and cluttered backgrounds are the most common mistake sellers make. Unmade beds, messy floors, and busy wallpaper distract from the item and make your shop look amateurish.
Choosing Your Background
| Background Type | Best For | Watch Out For |
| White foam board (A1 size) | Small to medium items, flat lays | Can get dirty quickly; replace when needed |
| Seamless paper roll | Full outfit shots, consistent look across listings | Needs a stand or wall mount |
| Clean wood floor or concrete | Aesthetic, lifestyle flat lays | Inconsistent if you move between rooms |
| Plain white wall | Hanging items, modeled shots | Shadows can be harsh without good lighting |
| White blanket or sheet | Budget flat lays on any surface | Wrinkles show in photos — iron or steam first |
How to set up the background for Depop product photography:
Step 1. Maintain a clean, consistent, and wrinkle-free background.
Step 2. Position your background for even light distribution.
Step 3. Frame your garment tightly while leaving breathing room for square crops.
⚠️ Warning: Avoid patterned or textured backgrounds — even subtle ones. They compete with the clothing pattern and make it harder for buyers to see what they're actually buying.
Best for: Sellers building a cohesive shop aesthetic. Especially important if you sell items across different categories or styles — a consistent background ties everything together.
3. Master the Flat Lay
Flat lay photography is the most popular style on Depop. It's straightforward, requires no modeling, and works for almost every clothing category. A good flat lay shows the full shape of the garment, including sleeves, neckline, hem, and any graphic or pattern.
How to take flat lay photos for Depop clothing products:
Step 1. Prep and Position: Steam out wrinkles, lint roll thoroughly, and lay flat near light.
Step 2. Shape and Style: Arrange sleeves symmetrically, tuck the sides, and add one minimal accessory.
Step 3. Frame and Compose: Stand above to shoot straight down, keeping your item perfectly centered.
Step 4. Capture All Details: Photograph the back view, intricate garment details, and the brand tag.
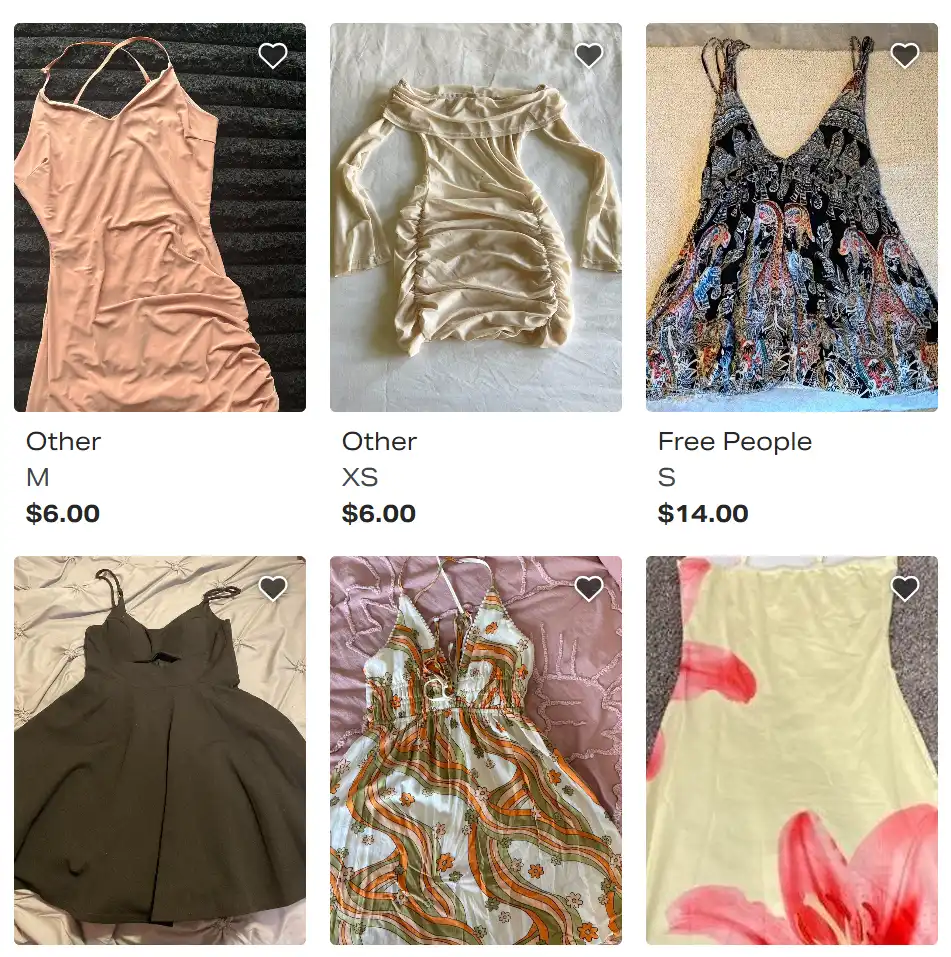
💡 Pro tip: Depop crops all feed images to square. Set your phone camera to 1:1 (square) aspect ratio before shooting. This way, what you see in the viewfinder is exactly what buyers will see in the feed — no surprises.
Best for: Sellers who can't or prefer not to model. Works especially well for tops, jackets, dresses, pants, and items where the shape matters more than the fit.
4. Take Modeled Shots That Convert
Modeled photos consistently outperform flat lays on Depop. Buyers want to see how an item fits on a real body — how the fabric drapes, where the hem falls, how the sleeves sit. Depop Seller Photography Guide reports that listings with modeled shots can see up to a 60% higher likelihood of selling.
How to take modeled shots for Depop clothing products:
Step 1. Set up at eye level with a timer
Position your camera on a tripod at chest height and use a remote or timer to capture flattering, undistorted photos.
Step 2. Stand away from your background
Stand one or two feet in front of your clean backdrop with front lighting to prevent casting harsh, distracting shadows.
Step 3. Capture three essential angles
Take clear photos of the front, side, and back to show buyers exactly how the item drapes and fits naturally.
Step 4. Highlight critical fit details
Show closeups of waistbands, cuffs, lengths, and jackets buttoned versus unbuttoned to proactively answer common sizing questions from potential buyers.
Step 5. Keep your styling neutral and simple
Wear basic base layers and avoid loud statement accessories so the item for sale remains the primary focus of shoppers.
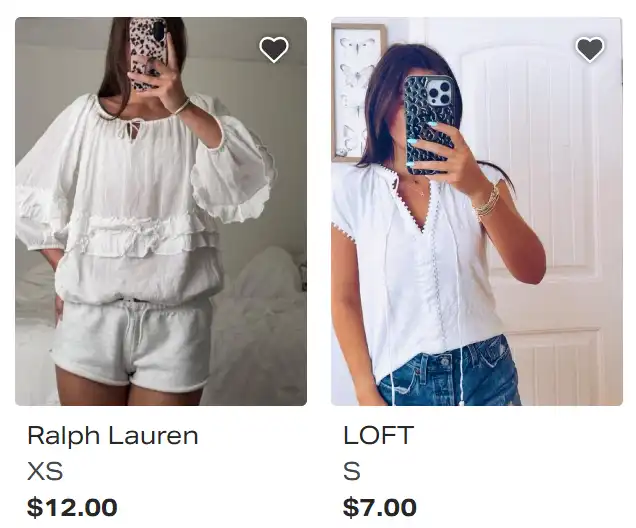
💡 Pro tip: If you're uncomfortable showing your face, that's totally fine. Depop sellers commonly crop at the chin or shoot from the neck down. The fit and drape are what matter — your face doesn't affect the sale.
Best for: Dresses, fitted tops, pants, jackets, and any item where fit and drape are key selling points. Essential for higher-priced items where buyers want confidence before purchasing.
5. Get the Composition and Angles Right
Even with perfect lighting and a clean background, poor composition can ruin a Depop photo. Common issues: the item is half-cropped, the angle makes proportions look off, or the photo doesn't show what the buyer needs to see.
Essential Shots for Every Listing on Depop
| Shot Type | What It Shows | Why It Matters |
| Full front | The entire item, flat lay or modeled | Cover photo — the first thing buyers see |
| Full back | Reverse side of the garment | Reveals back designs, tags, and overall condition |
| Detail close-up | Fabric texture, pattern, buttons, embroidery | Shows quality and unique features |
| Tag/label | Brand tag, size label, care tag | Builds buyer trust — proves authenticity |
| Flaw documentation | Any stains, pulls, fading, or repairs | Honesty builds long-term seller reputation |
How to get the right composition and angles for Depop products:
Step 1. Frame Widely with Grid: Use a grid overlay and leave margin for Depop's square crop.
Step 2. Shoot Straight On: Avoid slants to keep your garment's natural proportions accurately aligned.
Step 3. Adapt for Item Types: Hang clothing neatly at eye level and frame accessories closely.
📌 Note: Depop's terms prohibit stock photos and images you didn't take yourself. Every photo in your listing must be an original photo of the actual item you're selling. Listings with stock photos can be removed.
6. Edit Without Over-Filtering
Editing is necessary after taking photos for Depop products - but over-editing can make items look different from reality, leading to returns, disputes, and negative reviews. The goal is to make the photo look like the item does in real life, just in better lighting.
What to Adjust (and What to Leave Alone)
| Adjustment | Dos | Don'ts |
| Brightness | Increase slightly if the photo is dark | Crank up until colors wash out |
| Contrast | Add +5 to +10 for more definition | Push so high that shadows go black |
| Saturation | +3 to +5 to compensate for flat lighting | Boost until colors look unnatural |
| Sharpness | Light sharpen to bring out fabric texture | Over-sharpen — creates noisy "crunchy" look |
| White balance | Correct if the photo looks too warm (yellow) or too cool (blue) | Shift colors so the item looks different from reality |
| Filters | Never | Never — filters alter colors in unpredictable ways |
How to edit Depop photos for better listing:
Step 1. Fix brightness and white balance first
Adjust exposure sliders to fix brightness, and tweak temperature tools on neutral white areas. (e.g. If the photo looks too yellow, move the warmth slider toward cooler. If too blue, move it toward warmer.)
Step 2. Crop to square if you didn't shoot in 1:1
Use the square crop tool to see exactly how your listing will appear in the Depop feed. Adjust the crop so the item is centered with even margins.
Step 3. Apply adjustments to all photos in a listing consistently
Don't edit the cover photo heavily and leave the rest untouched. Inconsistent editing within a listing looks sloppy and erodes buyer trust.
Step 4. Preview on a second device if possible
Check the colors on a different device to see if they match. Avoid severe color differences before uploading.
⚠️ Warning: The most common buyer complaint about photos is "the color looked different in person." Always err on the side of under-editing. It's better for a photo to look slightly less vibrant than for a buyer to receive something that doesn't match their expectations.
Beyond DIY Photos: How AI Tools Help Depop Sellers Create Professional Visuals
One of the biggest challenges for growing Depop shops isn't taking one great photo—it's keeping every listing visually consistent. AI visual production tools like Koozee help apparel sellers create more consistent model try-ons, clean backgrounds, and product visuals without organizing a new photoshoot for every item. You can just upload a simple product photo and the platform generates professional-grade visuals for your listings. Here's what's relevant for Depop sellers:
AI try-on photos: Upload a flat photo of any clothing item and Koozee generates realistic model try-on images — different models, poses, and angles. No model needed, no photoshoot to arrange. This is especially useful for fitted items where buyers want to see how the garment drapes on a body.
Background replacement and cleanup: Turn a photo taken on your bed into a clean, studio-looking product shot with a single click. Koozee can remove backgrounds and place items on any scene.
Product videos: Depop now supports video listings, and Koozee can turn your product images into short apparel videos — lookbooks, outfit clips, and dynamic product showcases that stand out in the feed.
AI-generated visuals are not identical to real photoshoots, and results vary depending on garment complexity. But for many Depop sellers — especially those managing high SKU counts, selling intimate apparel, or simply not wanting to model — the time savings and consistency make it worth exploring.
✅ Recommended: Koozee offers 30 free credits for new users, so you can test it with your own clothing product before committing. Start with one listing and compare the AI try-on results against your current flat lay photos. Get Koozee free credits now!
Quick Comparison: Which Photo Style Should You Use?
| Photo Style | Effort Level | Equipment Needed | Best For | Limitations |
| Flat lay | Medium | Clean surface, good light | Tops, jackets, pants, most casual items | Doesn't show fit on body |
| Modeled shot | Medium–High | Tripod, remote shutter, model/mannequin | Dresses, fitted items, higher-priced pieces | Time-consuming; not everyone is comfortable modeling |
| Hanging item | Very low | Hanger, wall | Quick listings, blouses, lightweight jackets | Doesn't show shape or drape well |
| AI-generated try-on | High | Flat product photo, AI tool account | Every item, especially lingerie and fitted items. Also best for sellers who can't model. | Requires learning a tool |
Use-Case Recommendation
| Your Situation | Recommended Approach |
| You're just starting and have zero equipment | Flat lay near a window + phone editing + AI try-on tool |
| You sell higher-end or fitted items | Modeled shots on tripod with remote |
| You're uncomfortable modeling yourself | Flat lay + AI try-on tool for fit preview |
| You sell in volume (many new listings weekly) | Flat lay for speed, modeled for high-value items + AI try-on tool for batch images |
| You sell lingerie, swimwear, or fitted apparel | AI try-on — professional, comfortable, and consistent |
Conclusion - Ready to Transform Your Depop Store
Mastering how to take good photos for Depop doesn't require a massive budget, a professional photography studio, or hours of tedious manual editing. However, it does require a clear understanding of the platform's visual culture and community expectations. By combining solid lighting basics, a consistent background that builds buyer trust, and strict adherence to Depop's square-crop format, you can create eye-catching product listings that sell.
Meeting the ongoing photography demands of a successful Depop shop—such as providing the high-converting modeled shots that buyers expect or maintaining perfectly crisp flat lays—can be a major operational hurdle. With Koozee, Depop apparel sellers can create more product visuals, launch products faster, and reduce dependency on traditional photoshoots and fragmented design tools. Whether you need model try-ons, flat-lay enhancements, or promotional product videos, you can handle your entire shop's visual workflow in one place. Try Koozee for free and start generating good photos for Depop today!
FAQ
Do I need a professional camera to take good Depop photos?
No. Most modern smartphones have cameras that are more than capable of producing excellent Depop photos. Lighting and composition matter far more than the camera hardware.
How many photos should I put in a Depop listing?
Always use all four available photo slots. The minimum recommended combination: front view, back view, detail close-up (fabric, pattern, or unique feature), and tag/label shot. If the item has any flaws, dedicate one photo to documenting them clearly — this builds trust and reduces returns.
How do I take good Depop photos at night or in bad lighting?
Use artificial daylight LED bulbs or softbox lights rather than warm lamps. Diffuse the light to prevent harsh shadows, or leverage AI image enhancement and background removal tools to instantly clean up low-light shots.
Should I use flat lays or modeled photos for my Depop shop?
Use both if you can. Modeled photos as the cover image (they get more engagement), with flat lays as supporting shots to show details and the garment's full shape. If you can only do one, flat lays are the most practical and consistent.
How do I stop Depop from cropping my photos?
Depop automatically crops all feed images to a 1:1 square. The best solution is to set your phone camera to square (1:1) aspect ratio before shooting. If you prefer shooting in 4:3 or full size, leave generous margins around your item and crop to square yourself before uploading.
Can I use AI tools to create Depop listing photos instead of taking them myself?
Yes, AI visual tools like Koozee can generate professional try-on photos, clean backgrounds, and product videos from simple flat-lay product shots. This approach works particularly well if you sell clothing that's difficult to photograph yourself (lingerie, swimwear, fitted items) or if you're managing a high volume of listings.
How do Depop photos affect how to sell clothes on Depop overall?
Great photos get buyers to click. After that, your description accuracy, pricing strategy, shipping speed, and communication all determine whether that click becomes a sale — and whether the buyer comes back.
You May Be Interested

Amazon Product Photo Requirements 2026: Compliance & Best Practices

Flat Lay Clothing Photography: Complete Guide for Apparel Sellers

How to Photograph Clothing Without Models: 6 Methods
