Top 14 Model Poses for Clothing Product Photography (2026)


For apparel e-commerce, a photography pose isn't just decoration — it's how buyers read fit, fabric, and feel without touching the garment. The wrong pose hides or misleads important details like the waistband, bunches the hem, or makes a quality dress look like a throwaway.
The best pose depends on what you need the image to communicate. A straight-on stance makes fit easier to compare, while a three-quarter turn adds shape and a walking pose shows movement. Below are 14 poses that cover the most common needs in apparel product photography.
Key Takeaways
Most versatile pose: The contrapposto (S-curve) is a versatile starting point for showing garment shape and drape across many apparel categories.
Best for catalog consistency: The front-facing straight-on keeps product images comparable across SKUs.
Best for back details: The over-the-shoulder look sells backless and open-back pieces.
Best for lifestyle energy: The walking stride brings activewear, outerwear, and flowy dresses to life.
What to look for: A good e-commerce pose always shows how the garment fits — waist, hips, shoulders, and length — without hiding the product.
Bottom line: Build a library of 4–6 poses per garment category, cover front/three-quarter/side/back, and repeat the same angles across your catalog.
Why the Right Model Pose Matters for Apparel E-Commerce
Online shoppers can't touch your fabric or try on your clothes. The pose is one of the closest substitutes for a fitting room. It needs to answer three questions in under five seconds:
Does it fit? The pose must show the garment's true silhouette — waistline, hip line, length, and how it sits on the shoulders.
Does it look good in motion? A pose that looks stiff on screen makes the garment look stiff too.
Does it match the brand? A streetwear label and a luxury lingerie brand shouldn't pose models the same way.
There's a second, quieter reason the pose matters: consistency. When every product in your catalog is shot at the same angles with the same pose language, shoppers can compare items side by side — and your brand instantly looks more professional.
Quick Reference Table
| Pose | Best For | Works With | Difficulty |
| 1. Contrapposto (S-Curve) | Overall fit & drape | Dresses, coats, fitted tops | Easy |
| 2. Front-Facing Straight-On | Catalog hero shots | All garments | Easy |
| 3. Hip Pop (Hand on Waist) | Waistline & silhouette | Dresses, high-waist pants, bodycon | Easy |
| 4. Hands in Pockets | Casual, relaxed fit | Jeans, trousers, jackets | Easy |
| 5. Crossed Arms | Structure & texture | Blazers, coats, knitwear | Easy |
| 6. Over-the-Shoulder | Back details | Backless dresses, open-back tops | Medium |
| 7. Three-Quarter Turn | Silhouette & drape | All garments | Easy |
| 8. Side Profile | Side fit & leg line | Fitted dresses, leggings, swimwear | Medium |
| 9. Walking Stride | Movement & lifestyle | Activewear, outerwear, trousers | Medium |
| 10. Wall Lean | Editorial lifestyle | Denim, streetwear, jackets | Easy |
| 11. Seated Stool | Seated fit | Jeans, skirts, shorts | Easy |
| 12. Ground Sit | Laid-back lifestyle | Casual wear, loungewear, shoes | Easy |
| 13. One-Foot-Up | Leg elongation | Denim, trousers, swimwear | Medium |
| 14. Fabric Play | Texture & flow | Dresses, silk, knitwear | Easy |
1. The Contrapposto (S-Curve) — The Foundation Pose
Contrapposto is one of the most widely recommended model poses, and for good reason: it's the pose that flatters almost any garment. The model shifts weight onto one leg, which tilts the hips and creates a natural S-curve through the body — elongating the torso and letting fabric hang the way it was designed to.
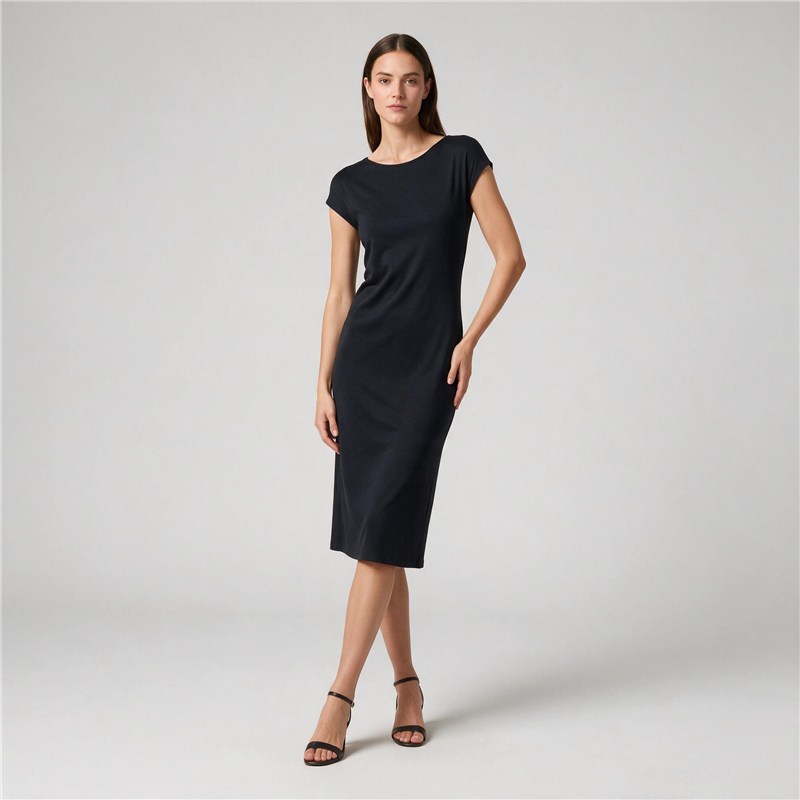
How to do it:
Shift the model's weight onto the back leg.
Bend the front knee slightly and angle the front foot toward the camera.
Let the hip on the weight-bearing side relax outward — just a few centimeters.
Drop the opposite shoulder slightly and keep arms soft at the sides, or rest one hand on the hip.
Best for: Dresses, coats, fitted tops, and anything where drape matters.
Watch out for: Overdoing the hip shift — an exaggerated curve distorts how the garment actually fits.
💡 Pro tip: Check the hemline before shooting. If the hem tilts too much, the garment looks poorly made. Adjust the hip angle until the hem sits naturally.
2. The Front-Facing Straight-On — The Catalog Hero
The model faces the camera directly, standing tall with feet about hip-width apart. It's the simplest pose on this list and the most commercially important one — this is the shot shoppers compare across sizes, colors, and products.
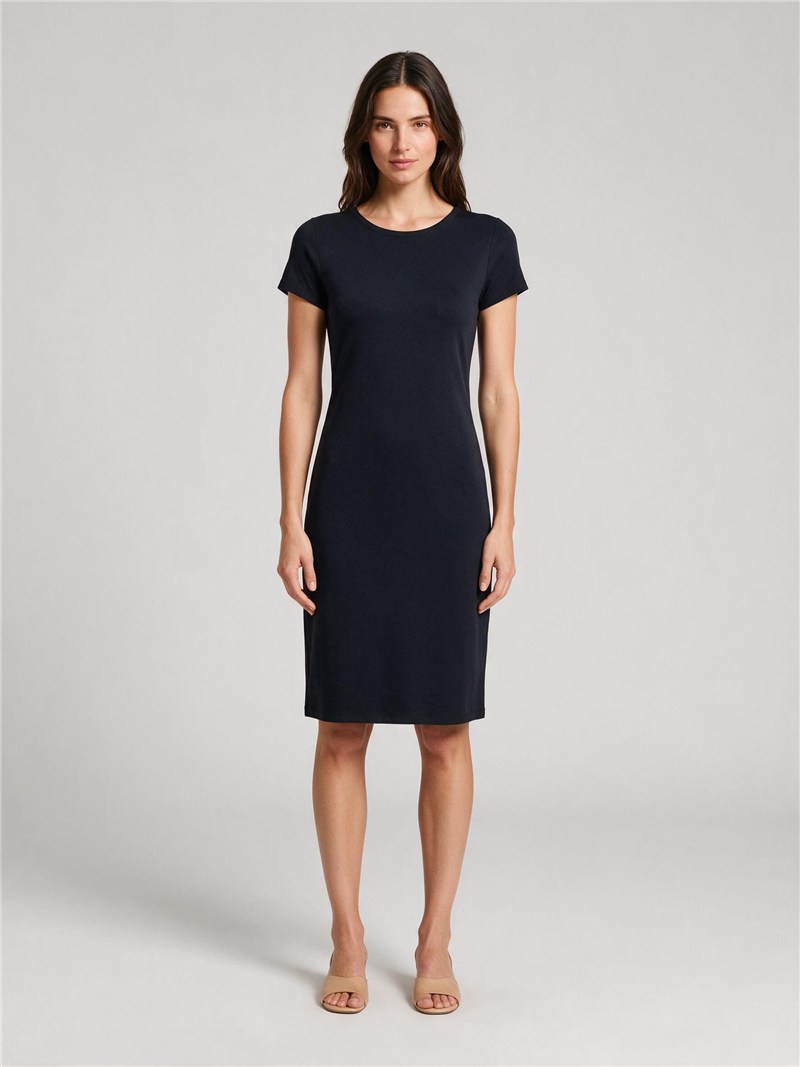
How to do it:
Stand tall with shoulders back and relaxed — no slouching.
Keep a small gap between the arms and torso so the garment's outline is visible.
Bring the chin slightly forward and down, eyes on the camera.
Keep weight even on both feet, with at most a subtle hip shift.
Best for: Product-first listings, new arrivals, size guide photos, and marketplace main images.
Watch out for: Stiff posture and a blank expression — a straight pose still needs relaxed shoulders and a natural look.
📌 Note: For comparable SKUs, keep the pose, framing, and camera angle as consistent as possible. When shoppers compare sizes or colors side by side, differences in angle read as differences in fit.
Also read: How to take product photos for Etsy
3. The Hip Pop (Hand on Waist) — Waistline Focus
One hand on the waist, hip pushed gently toward the same side. The pose frames the waistband and draws the eye straight to the garment's most important fit point.
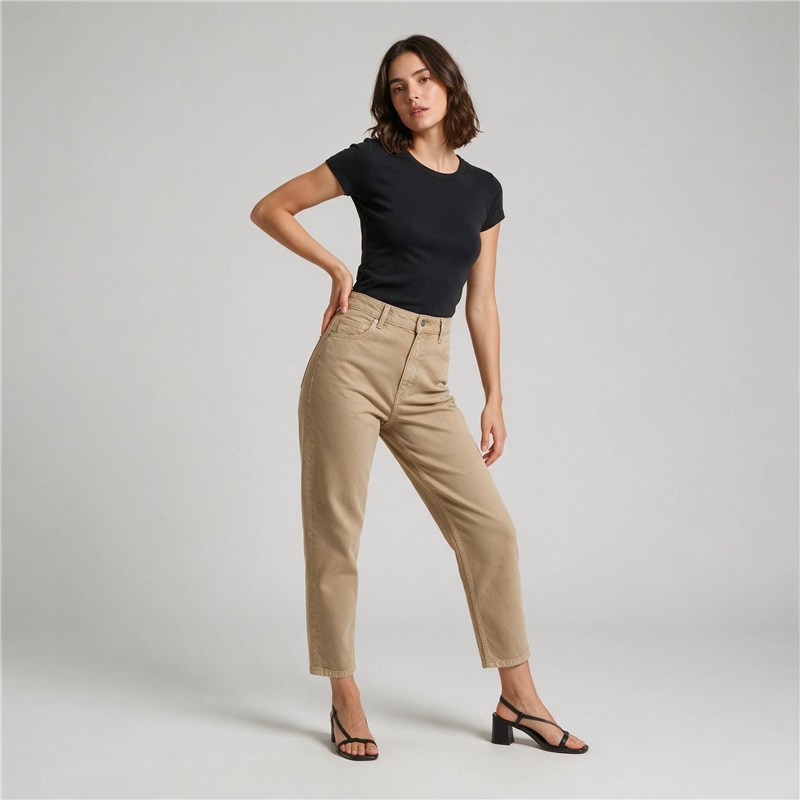
How to do it:
Place one hand on the waist or hip, fingers relaxed.
Shift weight to the same side and push the hip out gently.
Let the other arm rest naturally along the body.
Turn the head slightly toward the camera or away.
Best for: Dresses, high-waisted pants, bodycon, and swimwear.
Watch out for: The hand covering the waistband or belt detail — the pose should frame it, not hide it.
💡 Pro tip: The hand should sit just beside the waistband. If the garment has a belt or waistband detail, keep it fully visible.
4. The Hands in Pockets — Casual and Approachable
A relaxed, everyday pose that signals comfort. Hands in pockets naturally relax the shoulders and let the garment show its true fit at rest — especially through the hips and thighs.
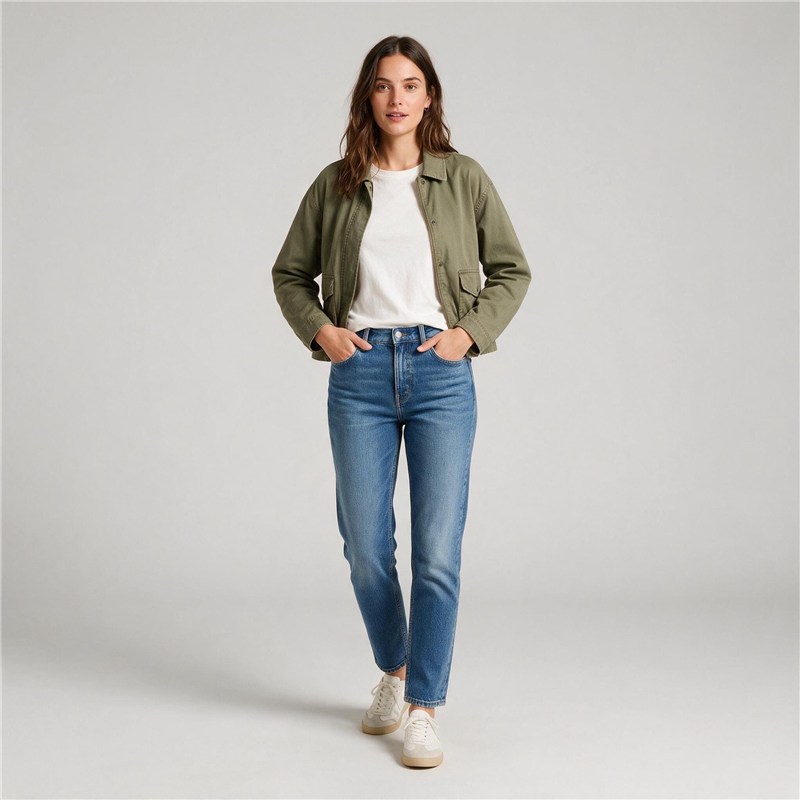
How to do it:
Slip one or both hands into the pockets.
Pull the shoulders slightly back to keep posture.
Shift weight to one leg or take a small step forward.
Look at the camera, or off to the side for a candid feel.
Best for: Jeans, trousers, jackets, and casual wear.
Watch out for: Pockets that bulge or pull — check the fabric strain before shooting.
💡 Pro tip: This pose works exceptionally well for jeans, casual tops, and jackets. Just make sure to check for any fabric strain around the pockets before shooting—if they bulge, it ruins the relaxed vibe.
5. The Crossed Arms — Structure and Texture
Arms crossed at the chest add structure and anchors the upper body. It's the go-to pose for showing off tailoring, knit texture, and outerwear — the arms can frame the garment without completely hiding it.
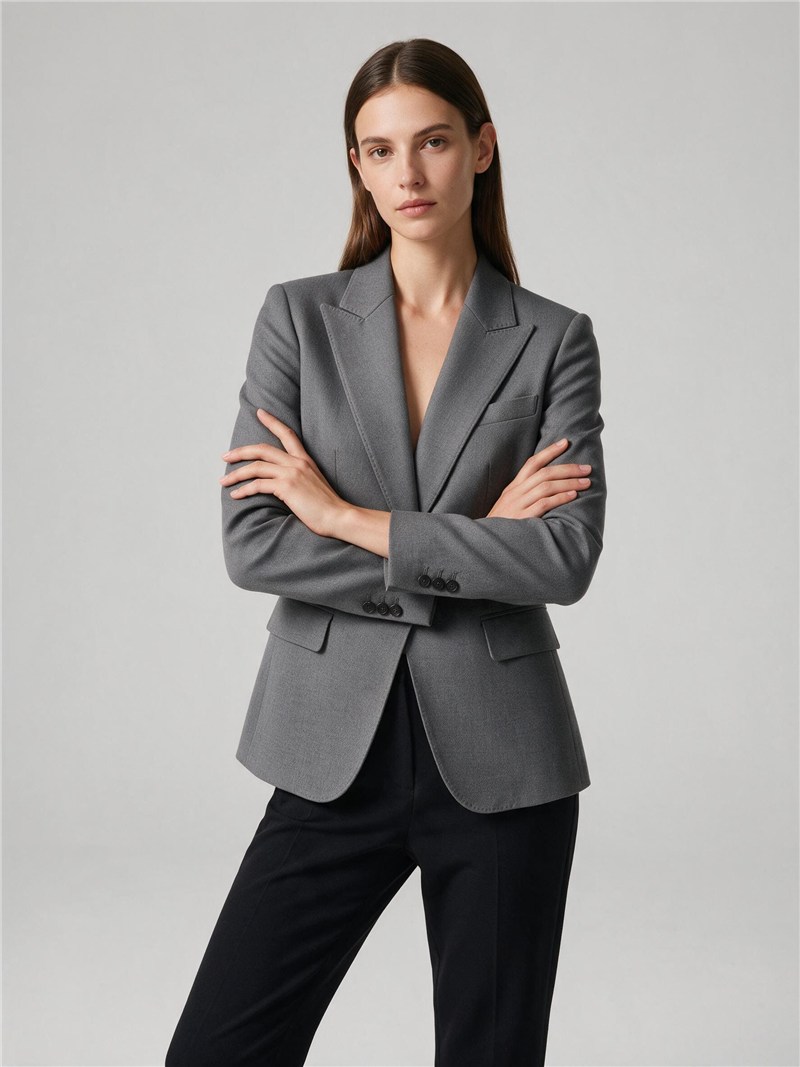
How to do it:
Cross the arms at mid-chest, hands resting near the elbows.
Keep elbows slightly away from the body so the garment stays visible.
Shift weight to one leg with a subtle hip pop.
Vary it: hands on opposite shoulders, or hands holding the sleeves.
Best for: Blazers, coats, knitwear, and long-sleeve tops.
Watch out for: Hiding the garment's closure — angle the body so zippers, buttons, and pockets stay visible.
⚠️ Warning: A fully front-facing crossed-arms pose can hide the garment's closure — the detail buyers care about most. Always angle slightly to one side.
6. The Over-the-Shoulder Look — Back Details
The model turns away from the camera, then looks back over one shoulder. It adds intrigue and — more importantly — shows the back of the garment, which is exactly where many designs do their best work.
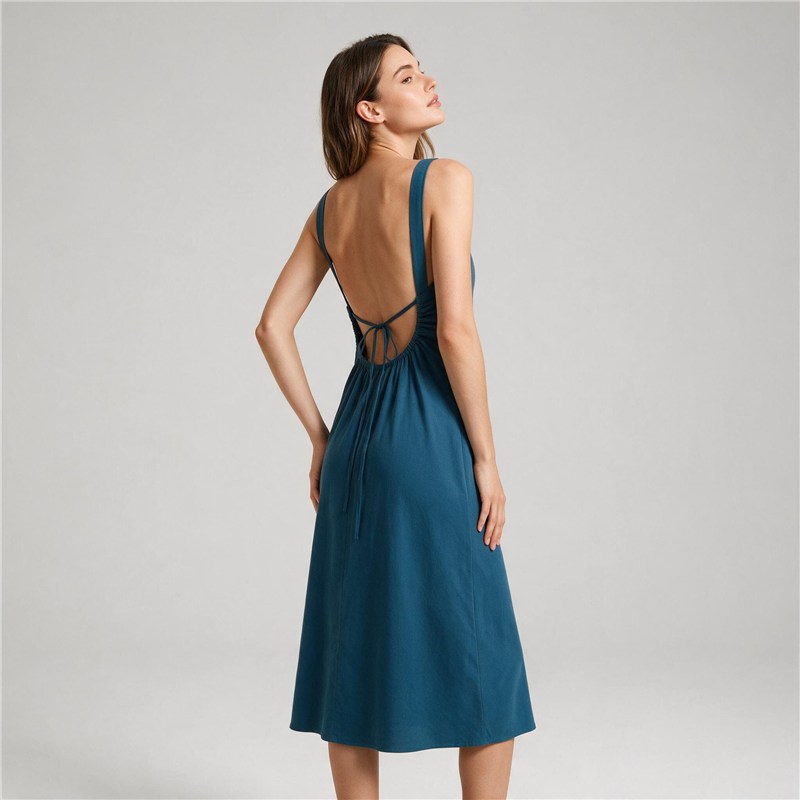
How to do it:
Turn the body 45–90 degrees away from the camera.
Look back over one shoulder, chin up.
Keep hair off the neckline if the back has details.
Place arms behind the back, on the hips, or relaxed at the sides.
Best for: Backless dresses, open-back tops, and any piece with back detailing.
Watch out for: The turned face falling into shadow — add a reflector or fill light.
💡 Pro tip: This is the shot that makes "back detail" a selling point on Amazon and Shopify galleries. Always include it for pieces with interesting backs.
You may also like: Flat lay clothing photography
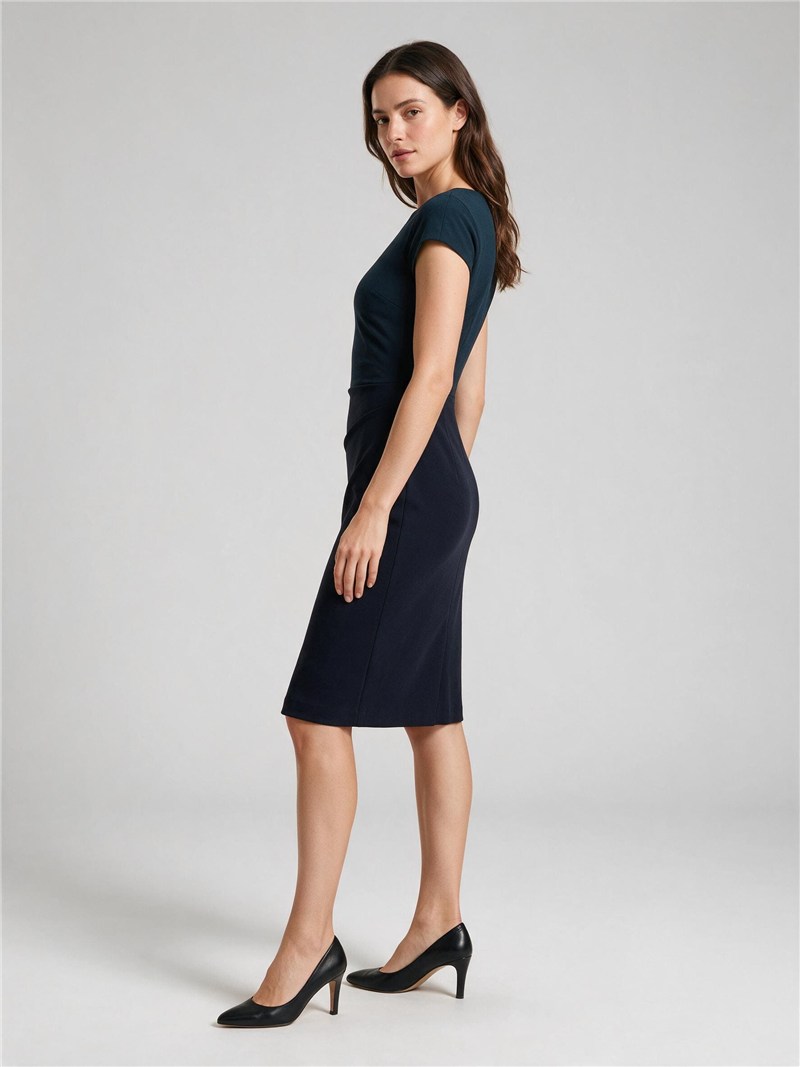
7. The Three-Quarter Turn — The Standard Catalog Angle
The body angled about 45 degrees to the camera with the head turned toward it. This pose shows the front fit, side silhouette, and hint of the back drape in a single frame — which is why it dominates professional catalogs.
How to do it:
Angle the body 45 degrees to the camera.
Point the front foot at the camera, back foot perpendicular.
Keep the spine long and the chest relaxed.
Look over the front shoulder into the lens.
Best for: Every garment type — it's the workhorse angle of apparel e-commerce.
Watch out for: Twisted hips — keep the hips aligned with the legs or the silhouette looks distorted.
📌 Note: Buyers can't rotate a product photo, so give them the angles in separate shots. The three-quarter turn earns its place in every product gallery.
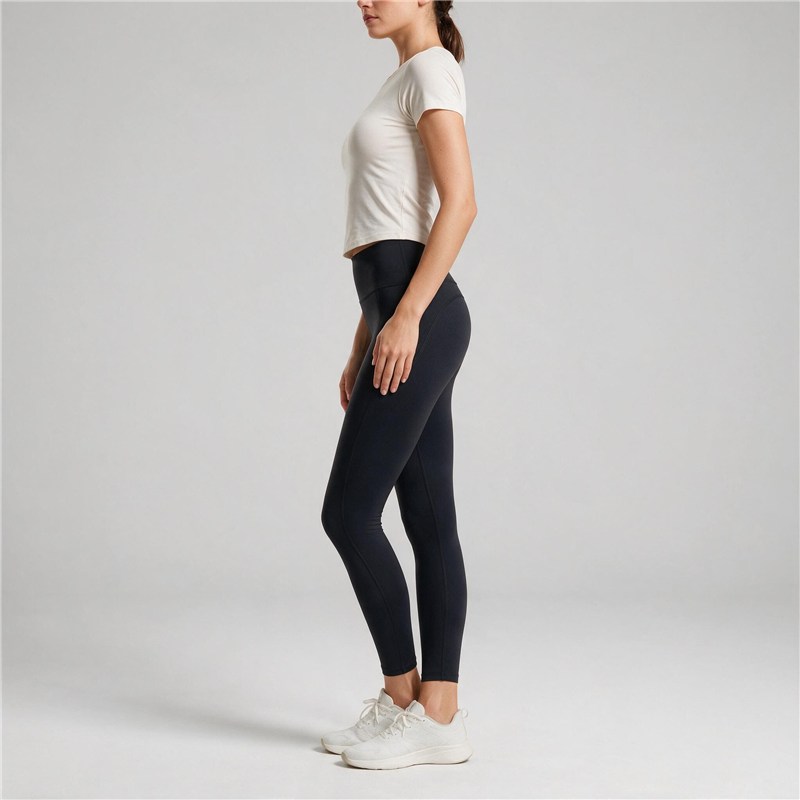
8. The Side Profile — Side Fit and Leg Line
The body turned 90 degrees to the camera. This is the honest pose — it shows exactly how the garment fits through the stomach, hips, and legs, which is precisely why shoppers look for it.
How to do it:
Stand perpendicular to the camera.
Place one foot in front of the other, or take a small step forward.
Rest one hand near the hip or thigh; keep the other arm down.
Keep the chin parallel to the floor.
Best for: Fitted dresses, leggings, trousers, swimwear, and bodycon pieces.
Watch out for: Fabric pooling at the waist — smooth the garment between frames.
💡 Pro tip: A hand placed lightly on the thigh anchors the pose and keeps the garment smooth in this angle.
9. The Walking Stride — Movement and Energy
A mid-stride walking motion that brings the garment to life. It helps show how activewear or flowy garments look in motion — energy that a static pose can't deliver.
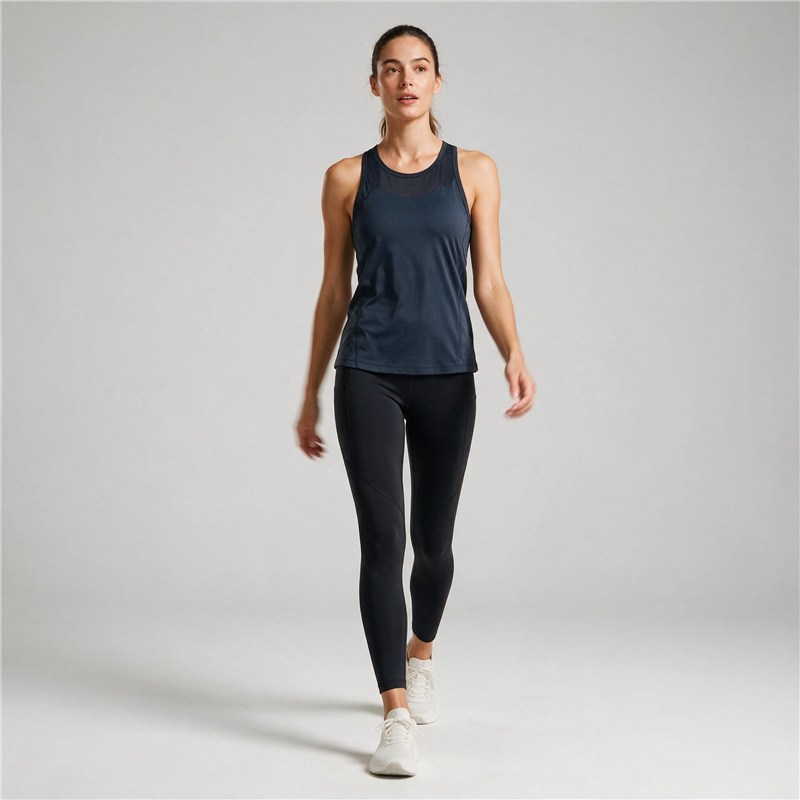
How to do it:
Have the model walk slowly toward the camera.
Exaggerate the stride slightly, extending the front leg.
Let the arms swing naturally.
Look at the camera, or just past it for a candid feel.
Best for: Activewear, outerwear, trousers, and dresses with movement.
Watch out for: Unnatural, performed arm swings — keep the motion loose.
💡 Pro tip: Shoot in burst mode or capture video frames. In a walking shot, the best frame is rarely the first one — take several and keep the best.
Also read: Best underwear virtual try-on tools
10. The Wall Lean — Relaxed Editorial
The model leans against a wall — shoulder or lower back against it, one foot resting against the wall or crossed in front. It reads as effortless and gives the shoot a lifestyle, editorial feel without any props beyond a wall.
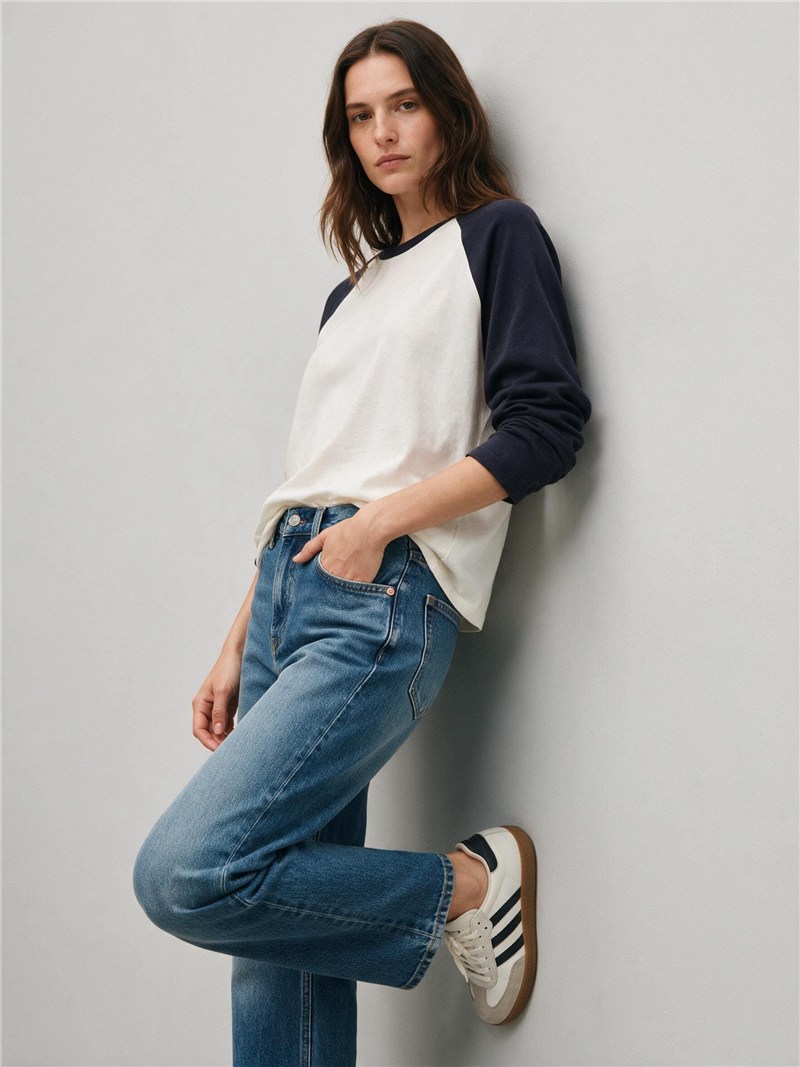
How to do it:
Place the shoulder or lower back against the wall.
Put one foot flat on the wall with the knee bent, or cross one ankle in front of the other.
Keep the standing leg straight.
Keep hands relaxed — in pockets or at the sides.
Best for: Denim, streetwear, casual tops, and jackets.
Watch out for: A busy background competing with the garment — plain, on-brand walls only.
11. The Seated Stool Pose — Casual and Approachable
The model sits on a stool or chair near the front edge, feet on the floor. Sitting changes how fabric drapes, which makes it essential for proving how pants and skirts behave in real life.
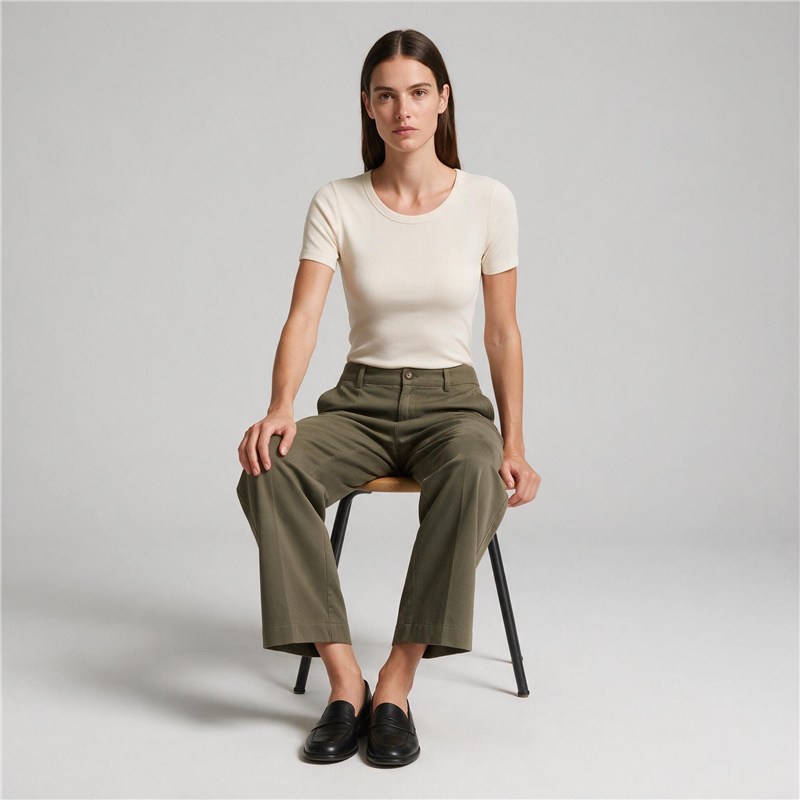
How to do it:
Sit at the front edge of the seat with the spine long.
Place feet flat on the floor, or cross the ankles.
Rest hands on the knees or one hand on the seat.
For skirts, angle both knees to one side.
Best for: Jeans, trousers, skirts, and shorts.
Watch out for: Slouching — a slumped pose hides the garment's structure and reads as low quality.
12. The Ground Sit — Laid-Back Lifestyle
The model sits directly on the floor, legs crossed or knees pulled up, weight propped on one hand. It's the most relaxed pose in the set and pairs beautifully with shoes, accessories, and summer pieces.
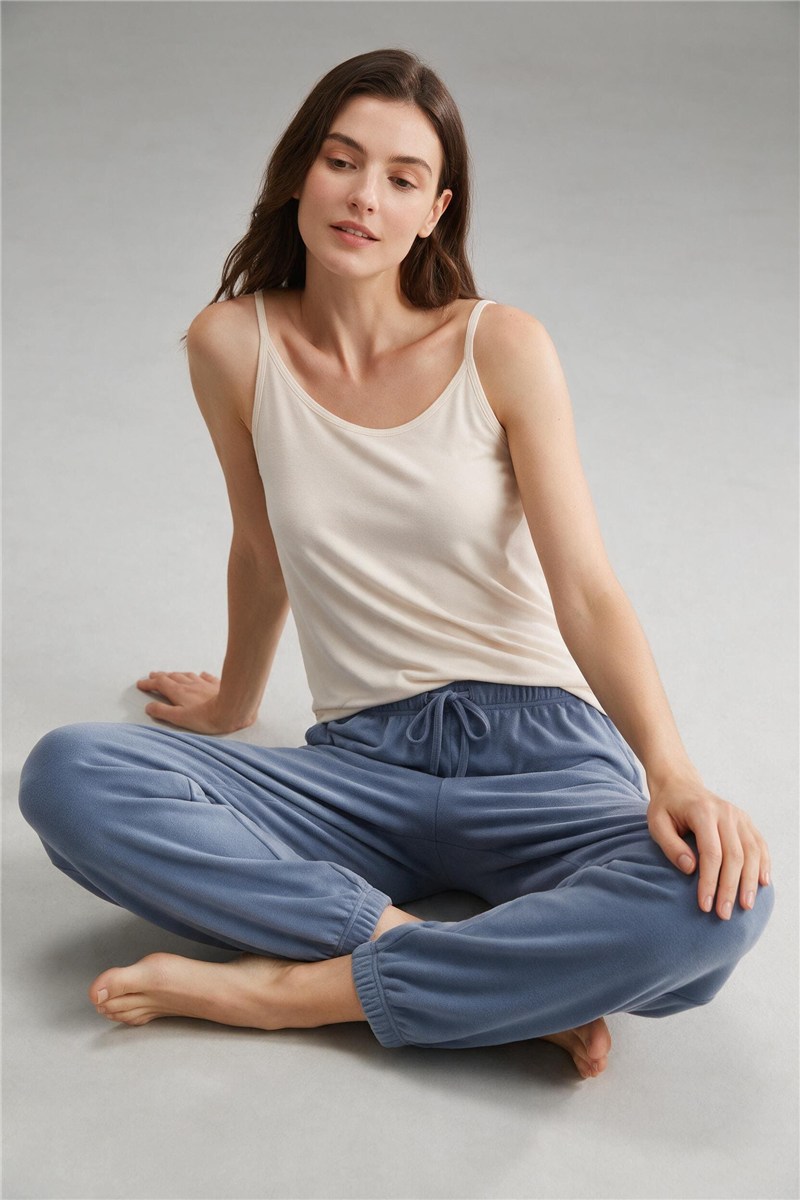
How to do it:
Sit with legs crossed or knees pulled toward the chest.
Prop the weight on one hand behind or beside the body.
Keep the torso tall and angled toward the camera.
Look at the camera, down, or away for a candid feel.
Best for: Casual wear, loungewear, shoes, and summer dresses.
Watch out for: Fabric bunching behind the model — smooth the garment before each frame.
💡 Pro tip: The ground sit naturally draws the eye downward — use it when shoes or leg details are part of the selling story.
13. The One-Foot-Up — Leg Elongation
One foot raised on a low prop — a stool, box, or step — with the knee bent. The raised leg creates a long diagonal line through the body and adds a confident, casual energy that reads especially well for denim and swimwear.
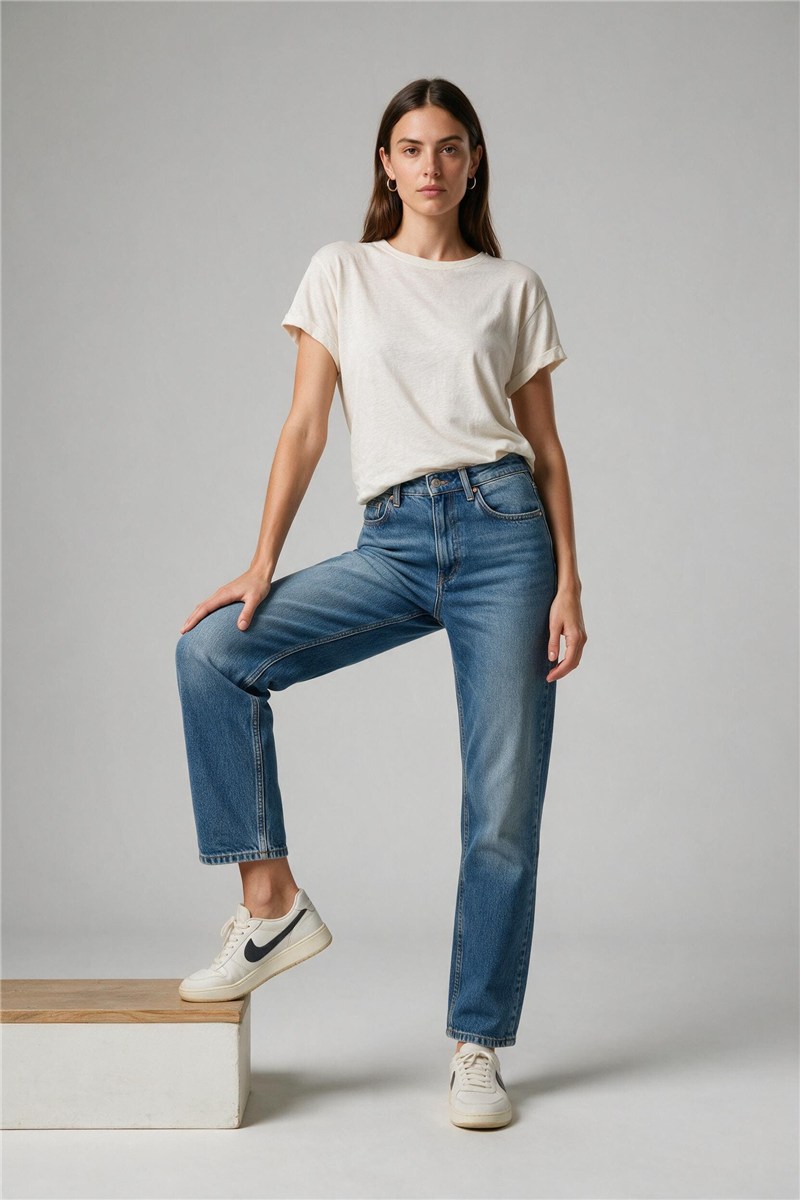
How to do it:
Place one foot on a low prop (at ankle height or slightly higher).
Shift weight onto the standing leg.
Rest a hand on the raised knee or slip it in a pocket.
Keep the torso tall with a slight hip angle.
Best for: Denim, trousers, swimwear, shorts, and streetwear.
Watch out for: A locked knee on the raised leg — keep it soft or the pose looks stiff.
💡 Pro tip: Keep the raised foot flat and the knee soft. A locked knee breaks the natural line and reads as tense on camera.
14. The Fabric Play — Texture and Flow
The model interacts with the garment — holding a hem, adjusting a collar, twirling a skirt, or brushing fabric. It's the most versatile "detail" pose because it shows texture, drape, and movement that a static stance simply can't.
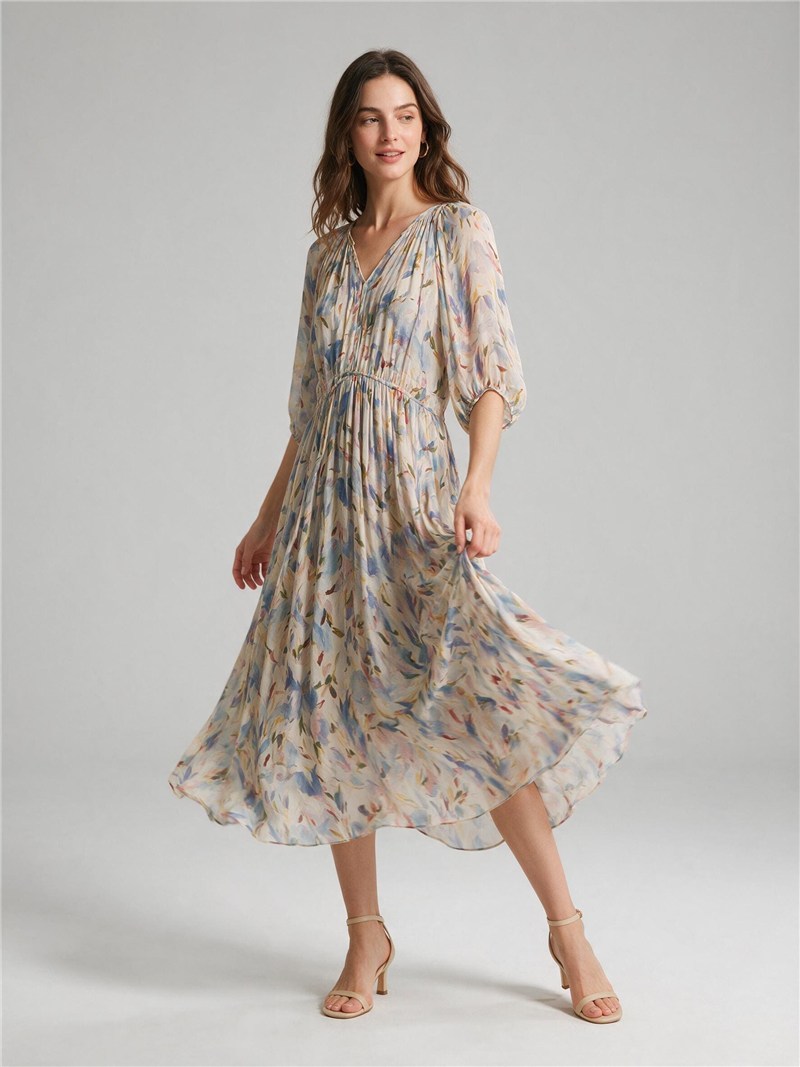
How to do it:
Choose one deliberate gesture: hold the hem, touch the collar, or spin the fabric.
Keep the gesture slow and small — no dramatic posing.
Look at the gesture or at the camera.
Shoot several frames and keep the most natural one.
Best for: Dresses, silk, knitwear, coats, and anything with flow or texture.
Watch out for: Gestures that hide the garment — the hand should frame the fabric, not cover it.
How to Match Poses to Your Garments
Not every pose works for every product. Here's the quick matching guide we use:
| Garment Type | Go-To Poses | What the Shot Should Emphasize |
| Dresses & skirts | Contrapposto, three-quarter turn, over-the-shoulder, fabric play | Drape, waistline, back details, hem movement |
| Jeans & trousers | Hands in pockets, one-foot-up, seated stool, walking stride | Fit through hips and thighs, rise, leg length |
| Outerwear & blazers | Crossed arms, contrapposto, wall lean | Structure, lapels, texture, shoulder fit |
| Activewear | Walking stride, one-foot-up, movement shots | Range of motion, breathability, performance |
| Lingerie, swimwear & bodycon | Front-facing, hip pop, side profile | Fit, support, silhouette — product presentation first |
| Knitwear & textured fabrics | Crossed arms, fabric play | Texture, drape, weight |
💡 Pro tip: For each garment, pick one "hero pose" and one "detail pose," then repeat the same pairing across the whole category. It keeps your catalog cohesive and makes production faster.
The 5 Product Views to Consider for Every Apparel Listing
Poses are only half the equation — every product needs a shot plan. A practical minimum for apparel listings is the "Big Four" angles, plus a detailed close-up:
Front — full garment, straight-on or contrapposto.
Three-quarter — silhouette and drape in one frame.
Side — honest fit through the torso and legs.
Back — back details, closures, and drape.
Detail close-up — fabric texture, buttons, stitching, or unique features.
Buyers can't inspect your garment in person, so every angle replaces a question they would have asked. A complete five-image gallery can give shoppers a clearer view of the product than a front-only gallery.
How to Keep Poses Consistent Across Your Catalog
A catalog with 100 products shot at 100 random angles looks amateur — no matter how good each individual photo is. Consistency is what makes a brand look established. Here's how to keep consistency:
Build a pose library: Define 4–6 core poses per garment category and stick to them.
Lock the framing: Same camera height, same zoom, same crop for the same pose across products.
Standardize the set: Same background and lighting for comparable shots.
Shoot in a fixed order: Front → three-quarter → side → back → detail, every product. It speeds up editing and quality checks.
Limit the model pool: One model or a small model set keeps body language consistent across your catalog.
💡 Pro tip: If your catalog has frequent new SKUs, keep a reference sheet of your pose library next to the camera — or use AI to generate consistent on-model visuals from product photos so the pose language never drifts.
Bonus: Koozee — Get the Best Model Poses Without a Live Photoshoot
If your real goal isn't just learn about the best fashion model poses but getting on-model product photos across dozens of SKUs — without booking multiple models, studios, and retouchers — Koozee stands out as a powerful AI visual production platform built specifically for apparel e-commerce sellers. It allows you to upload a clothing product photo and up to 5 model photos (with the pose you want - front, three-quarter, side, back, seated, or walking) to generate on-model clothing images in a few clicks.
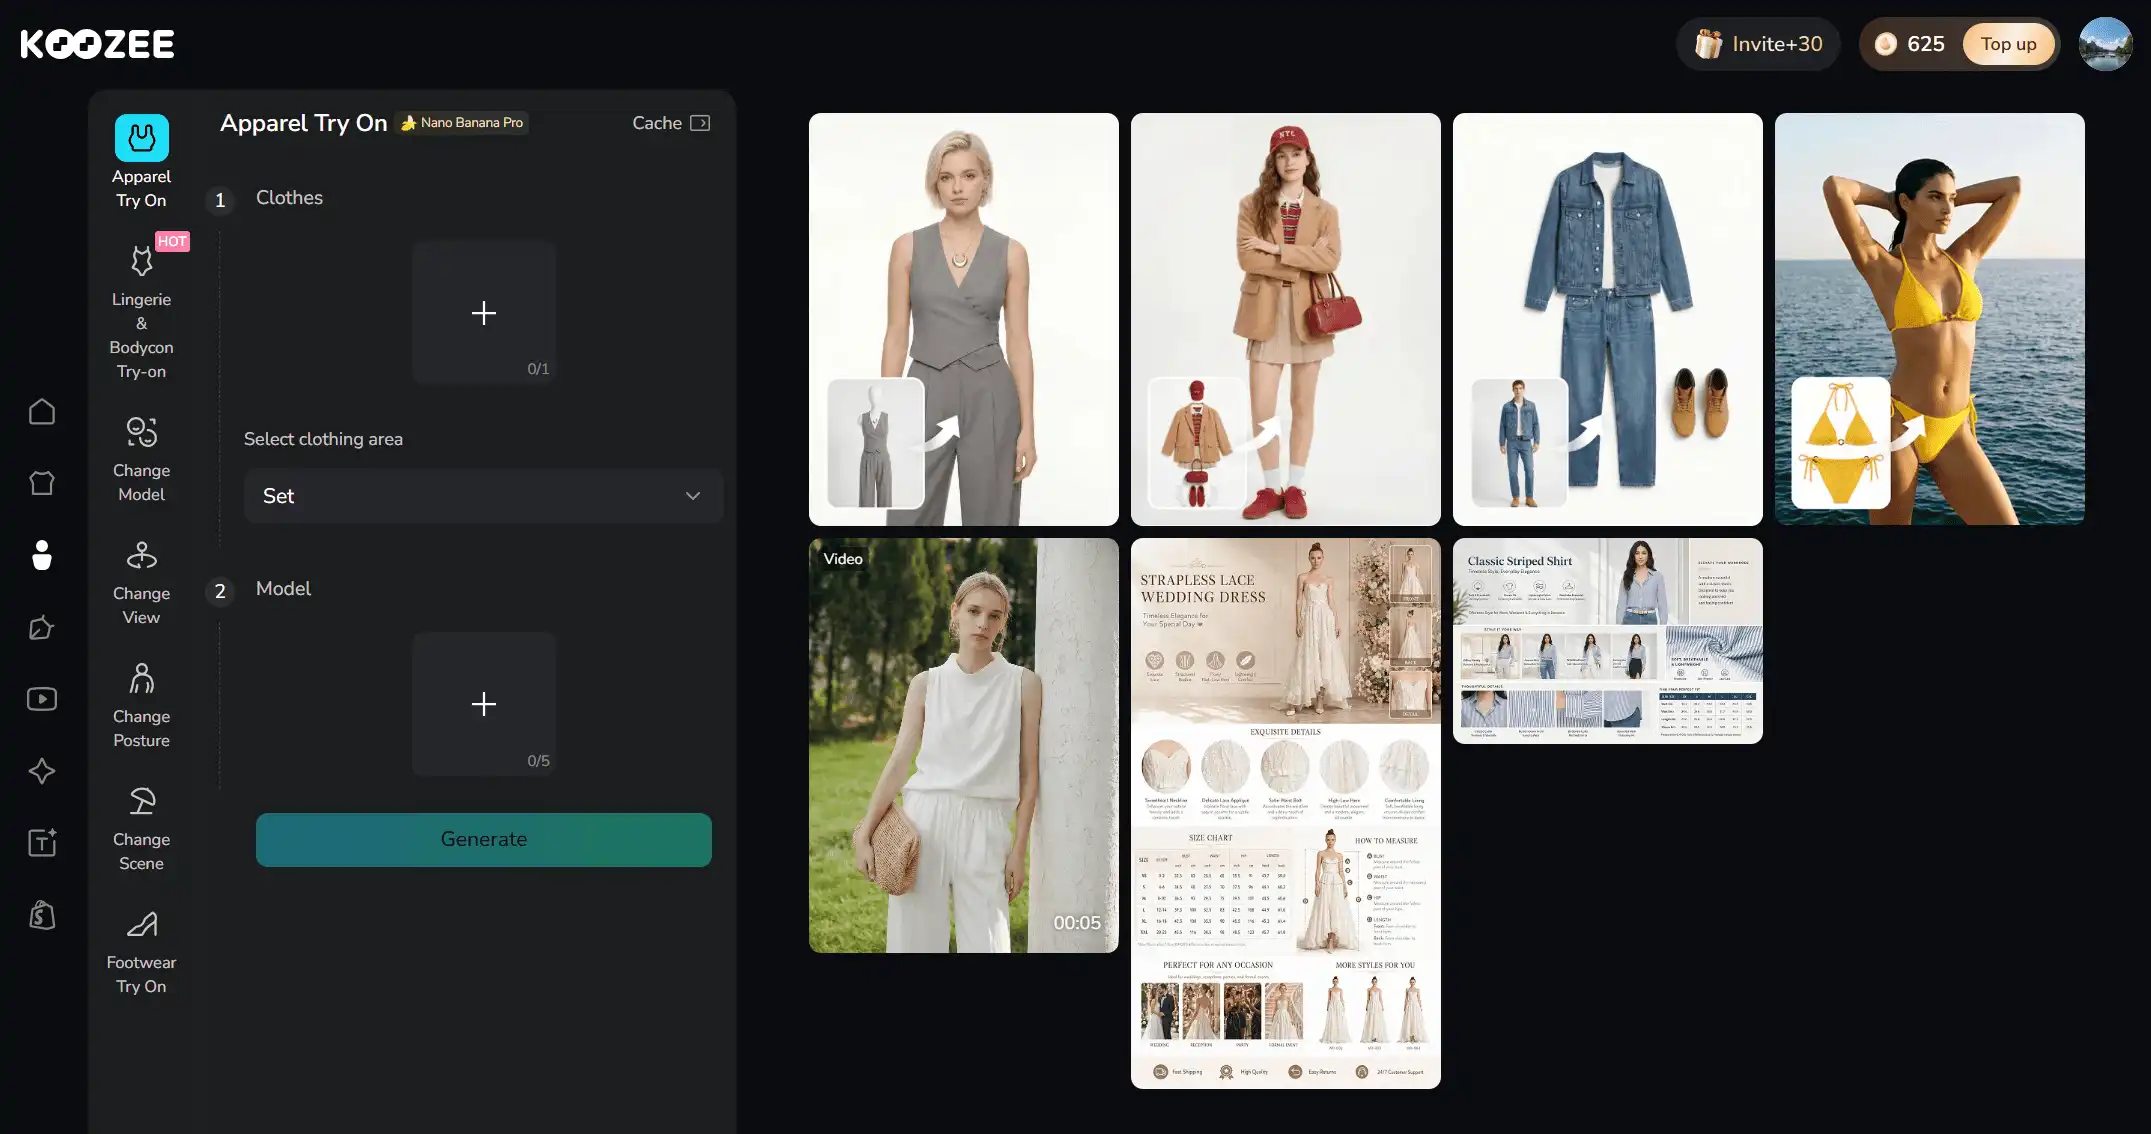
Key features of Koozee:
Turn clothing product photos into on-model visuals for dresses, jeans, swimwear, lingerie, and more.
Change pose,model, background, and angle to create multiple presentations from one garment photo.
Connect Shopify, reuse product images, preview AI visuals, and manually publish approved assets back.
Generate product images, detail shots, flat lays, ghost mannequin visuals, lookbooks, and short outfit videos.
Enhance, cut out, change backgrounds, and clean up clothing product images and videos for listings.
Best for: Apparel sellers who need consistent model visuals at scale without a high photoshoot budget.
Limitations: AI-generated try-ons should be reviewed before publishing, and unusual fabrics (lace, reflective materials, layered garments) may need manual adjustments.
✅ Recommended: Try Koozee with 30 free credits. Start with one product image and generate a few pose variations to see which angles work for your catalog — then roll the winners out across your entire line.
Final Words
The best model pose for clothing product photography depends on what shoppers need to understand about the garment. Use front-facing, three-quarter, side, and back views to establish a consistent product foundation, then add poses that highlight the item’s main selling point—such as a hip pop for the waistline, an over-the-shoulder view for back details, or a walking stride for movement. For a practical workflow, choose one hero pose and one detail or lifestyle pose for each garment category. Keep the camera angle, framing, lighting, and model direction consistent across comparable products, and make sure dynamic poses never hide or distort the garment. Whether you work with a live model or an AI try-on tool like Koozee, the goal is the same: show the fit, construction, texture, and movement clearly enough that shoppers can make a confident decision.
FAQs: Best Model Poses for Clothing Photography
What is the difference between a pose and a camera angle?
A pose is the subject’s body position and arrangement, while a camera angle is the viewpoint from which the photo is taken. Both are important for good clothing photography.
Can AI generate consistent poses across a clothing catalog?
Yes, AI can generate consistent poses across a clothing catalog by using pose-control models and reference templates to standardize body positions.
What is the most flattering model pose for clothing photos?
The contrapposto (S-curve) — weight on one leg, hip relaxed, opposite shoulder dropped. It elongates the body, lets fabric hang naturally, and flatters nearly every garment type. If you learn one pose, learn this one.
How many poses should a clothing brand use per product?
Four to six poses are recommended: front, three-quarter, side, and back, plus one or two detail or lifestyle poses. More angles help shoppers understand fit, but beyond six you hit diminishing returns and slow down production.
What are the best model poses for dresses?
The contrapposto for overall drape, the three-quarter turn for silhouette, the over-the-shoulder look for back details, and fabric play for movement. Match the pose to the dress's selling point — waistline, back, or flow.
What poses work best for activewear?
Movement-based poses — the walking stride above all. Add stretching, reaching, or mid-action frames so shoppers can see the garment performing. Static poses undersell the product's function.
What are the best poses for lingerie, swimwear, and bodycon?
Front-facing, hip-pop, and side-profile — poses that show fit, support, and silhouette with a focus on product presentation. Keep the styling and posing commercially clean; the product is the story.
How can I get model poses without hiring a model?
Use AI try-on tools like Koozee, which generate on-model visuals from a product photo and let you change the posture, model, and scene. It's the fastest way to test poses across a catalog before committing to a full photoshoot.
You May Be Interested

Amazon Product Photography for Clothing Sellers: 3 Methods 2026

Amazon Product Photo Requirements 2026: Compliance & Best Practices

How to Use AI Models for TikTok Shop: 3 Methods for Sellers