12 Best Example Poses for Clothing Brand Photography
See 12 example poses for clothing brand photography, with garment-specific tips for dresses, jeans, outerwear, activewear, and more.


A good clothing photoshoot doesn't need dozens of poses. It needs the right poses for the garment.
A fitted dress needs a different stance from a pair of jeans. A backless top needs a rear view. Activewear needs movement. The problem is knowing which pose shows the product best—especially when one shoot has to cover dozens of SKUs.
This guide breaks down 12 clothing photography poses, what each one shows, how to direct it, and where to use it across product pages, marketplaces, and social.
Key Takeaways
Match the pose to the garment: Choose poses that show fit, shape, details, or movement.
Three-quarter turn: A versatile starting point for showing overall fit and shape.
Use the right angle for the detail: Try over-the-shoulder for back details, profile for silhouette, and walking poses for movement.
Check platform rules: Amazon MAIN images have stricter requirements than secondary images; Shopify gives you more flexibility.
Build a repeatable set: You don't need all 12 poses. A consistent set of 6–8 poses can cover most collections.
Quick Comparison Table
| Pose | Best For | Where to Use | Model Skill Level |
| Three-Quarter Turn | Fitted dresses, tees, denim | Product pages, all galleries | Beginner |
| Hands-on-Hips | Tops, blouses, fitted dresses | Product pages, lookbooks | Beginner |
| S-Curve | Dresses, formalwear, long coats | Lookbooks, brand imagery | Intermediate |
| Walking Stride | Activewear, maxi dresses, outerwear | Social, secondary images | Intermediate |
| Over-the-Shoulder | Open backs, cutouts, back details | Galleries, social | Beginner |
| Profile | Side slits, blazers, skirts | Secondary gallery images | Beginner |
| Hand-in-Pocket | Trousers, jeans, jackets | Lookbooks, social | Beginner |
| Cross-Body Arm | Knitwear, blazers, button-ups | Product pages, lookbooks | Beginner |
| Seated | Trousers, jeans, loungewear | Lifestyle, secondary images | Beginner |
| Hands-Up Stretch | Activewear, swimwear, bodysuits | Social, secondary images | Intermediate |
| Lying Down | Lingerie, sleepwear, flowy dresses | Lookbooks, social | Intermediate |
| The Lean | Streetwear, basics, new models | Lifestyle, social | Beginner |
12 Clothing Brand Photography Poses
Three-Quarter Turn
The model stands at roughly a 45-degree angle between a full-front view and a side profile, with the chin turned slightly toward the camera. It is a versatile starting point for apparel product photography because it shows the front and enough of the side to make the fit and silhouette easier to read. Keep the weight on the back leg, soften the front knee, and let the arms rest naturally—one hand can sit near the hip or pocket. A slight drop in the front shoulder can keep the pose from looking too rigid.
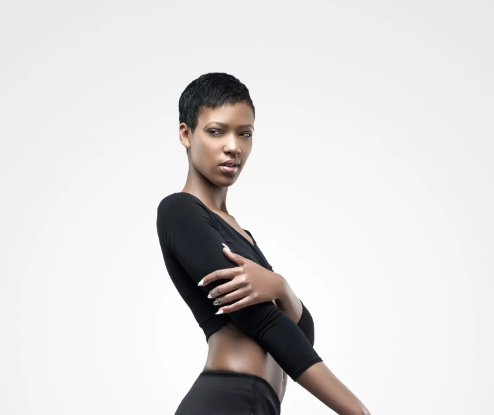
This pose works particularly well for fitted dresses, T-shirts, denim, and trousers. It is useful as a primary product image, but it doesn't show the back, so pair it with a rear or three-quarter rear view when back details matter. For flowy garments, consider adding a walking or movement shot to show how the fabric drapes.
Hands-on-Hips
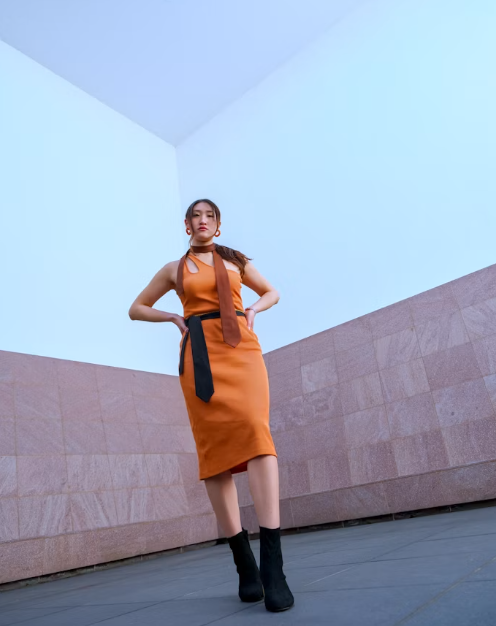
With one or both hands resting around the hips, the pose creates open space between the arms and torso, making the waistline and overall silhouette easier to see. Keep the fingers relaxed, thumbs angled back, and elbows slightly behind the body rather than pushing them toward the camera. Placing the hands just above the hip bone can draw attention toward the garment's narrowest point without covering too much of the fabric.
This works especially well for blouses, fitted tops, dresses, and styles with a defined waist, belt, or cinched detail. Be careful not to cover important waistband features, belt loops, or hardware. The pose can also look overly forceful when the elbows are pushed too far forward, so a relaxed shoulder and soft hands usually produce a more natural result.
The S-Curve
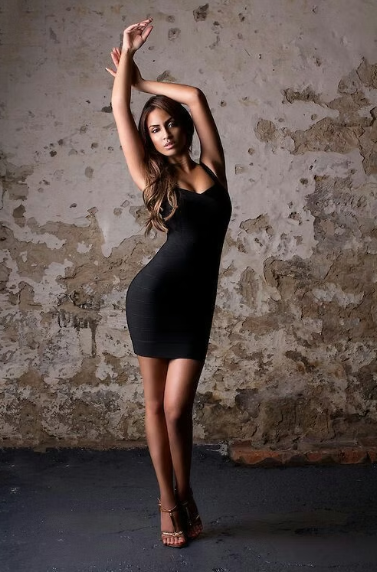
The S-curve uses a classic contrapposto stance: weight on one leg, the opposite hip slightly out, and the shoulders gently counter-tilted. It elongates the silhouette and shows how fabric falls around the waist, hips, and legs.
Have the model shift weight onto the back leg, push the near hip out slightly, relax the opposite shoulder, and keep the neck long. It works especially well for maxi dresses, gowns, formalwear, and long coats. Avoid it on casual pieces where the pose can feel too editorial.
The Walking Stride
A walking stride shows how fabric moves when the garment is actually worn. Have the model walk slowly toward the camera or diagonally across the frame with small, natural steps. Shoot continuously and select the frame with the best fabric movement and posture.
It works well for activewear, maxi dresses, flowing garments, and outerwear. Motion blur and awkward foot placement are the main risks, so use it as a secondary product image rather than the main shot.
The Over-the-Shoulder Look
The model faces away from the camera and turns her head over one shoulder, drawing attention to the back of the garment. It is useful when the rear view has a design detail that standard front and three-quarter poses cannot show.
Keep the spine tall and shoulders relaxed, and move hair away from the back. Use it for open-back dresses, cutouts, back zippers, and distinctive jacket panels. Since the front is hidden, it only earns gallery space when the back is genuinely part of the product's appeal.
The Profile
A full side view gives the clearest read on a garment's actual silhouette: how the hem falls, where the side seam sits, and whether the fit is slim or relaxed. It is especially useful when shape and proportions are important to the buying decision.
Have the model stand tall with her arms slightly away from the body, chin parallel to the floor, and weight balanced across both feet. Use it for dresses with side slits, structured blazers, skirts, and other silhouette-driven pieces. Keep it as a secondary gallery image, since it cannot replace a clear front view.
Hand-in-Pocket
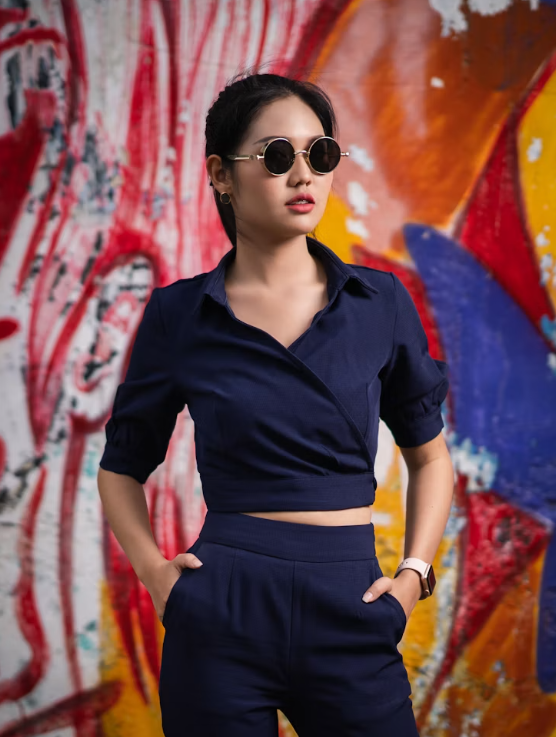
Putting one or both hands into the pockets makes trousers, jackets, and casual pieces feel more natural and wearable. It helps the garment look like something a customer would actually wear rather than a product being posed for the camera.
Have the model keep the hands relaxed, with thumbs slightly visible if that feels natural, then shift her weight onto one leg. This works well for jeans, trousers, jackets, streetwear, and loungewear. Avoid it when the pocket itself is a key design feature, since the hand can hide its shape or hardware.
The Cross-Body Arm
With one arm loosely crossed over the body, this pose creates a stronger frame around the torso and naturally draws attention to the garment's shape, texture, and tailoring. Angle the body 30–45° from the camera rather than facing it directly, and keep the free arm relaxed.
It works particularly well for knitwear, blazers, and button-up shirts. The main drawback is coverage: the crossed arm can hide chest graphics, logos, buttons, or other front details. Use it when the overall fit or texture matters more than those elements.
Watch for: The crossed arm can hide buttons or graphics.
The Seated Pose
A seated pose shows how trousers, jeans, and shorts behave in a more realistic everyday position. It can reveal the rise, knee stretch, and fabric drape around the hips—details that a standing pose may not capture.
Have the model sit near the front edge of a stool or chair with a straight but relaxed posture. Keep the ankles crossed or place one foot slightly forward, with the hands resting naturally on the lap or thigh. It works well for trousers, denim, shorts, loungewear, and lifestyle images. Because sitting creates wrinkles and changes the garment's fit, steam the clothing beforehand and use it as a secondary image rather than the main product shot.
The Hands-Up Stretch
An overhead stretch shows how a garment behaves when the body moves. For fitted and performance pieces, it can demonstrate stretch, range of motion, and support in ways a static pose cannot.
Have the model make a slow, natural stretch rather than holding an exaggerated position. Shoot continuously and choose a frame where the movement looks effortless. This works well for activewear, swimwear, and bodysuits, but the raised arms can distort shoulder and underarm fit. Use it as a secondary image or for social content rather than the main product shot.
The Lying-Down Pose
A reclined pose lets lightweight fabrics drape and settle naturally while creating a softer, more intimate feel. It works particularly well for lingerie, sleepwear, loungewear, and flowy garments in editorial or lifestyle photography.
Have the model keep the body relaxed, turn slightly toward the light, and support the pose naturally with one arm. Shooting from slightly above usually gives a cleaner view of the garment. Because the pose provides less reliable fit information and may conflict with marketplace or advertising image rules, keep it for editorial, lifestyle, and social content rather than primary product images.
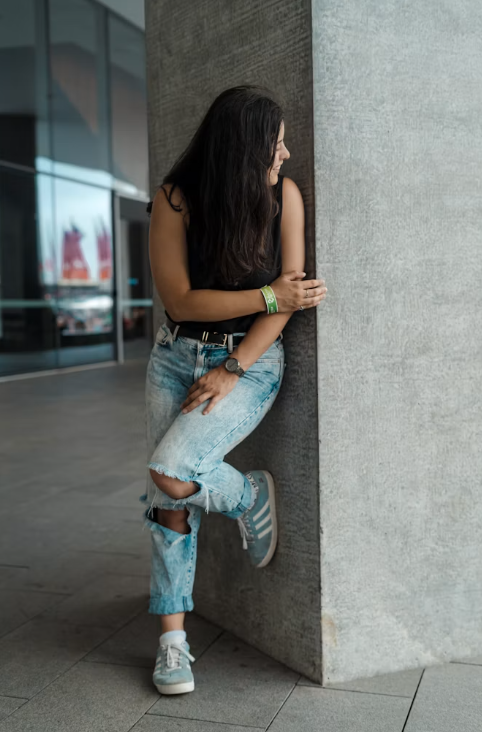
The Lean
Leaning against a wall, railing, or other surface gives less experienced models a natural way to position their bodies. A slight weight shift and crossed feet create a relaxed silhouette without requiring complex posing.
Have the model rest her shoulder or lower back against the surface, cross one foot over the other, and keep her hands relaxed. It works well for streetwear, basics, lifestyle shoots, and social content. The trade-off is that leaning can hide part of the garment and make fit harder to judge, so it is better suited to lifestyle imagery than detailed product galleries.
How to Choose the Right Poses for Your Brand
You don't need all 12 poses. You need a repeatable mix of 6–8 that matches your catalog.
Start with the garment. Fitted styles need the three-quarter turn and hands-on-hips. Back-detailed pieces need the over-the-shoulder. Flowy or performance fabrics need the stride and the stretch. Map each pose to a garment category once, and reuse the mapping every collection.
Then check the platform. Amazon MAIN images have stricter requirements: for apparel, models should be standing, the background should be pure white, and the product should fill at least 85% of the frame. Shopify galleries reward variety: a hero shot plus front, back, side, and detail angles. Follow Amazon's product image guide and Shopify's ecommerce photography guide for the current requirements.
Match the model's experience. Beginner models handle the lean, seated, and three-quarter turn easily. Save the S-curve, stride, and hands-up stretch for models with practice — or give any model an extra 30 seconds of demonstration.
Build a pose library. Shoot the same 6–8 poses across every product in a collection, at the same angles and focal length. This makes the catalog easier to recognize and easier to produce — and it makes lookbooks, ads, and listing assets interchangeable without reshoots.
💡 Pro tip: Write your pose list into a one-page shot sheet — pose name, one-line cue, which garment it's for. Hand it to every photographer and model so shoots stay consistent as you scale.
Need More Pose Variations Without Another Shoot?
When a clothing brand has dozens of SKUs, creating every model, pose, and scene variation through another photoshoot can quickly become expensive and time-consuming.
Koozee offers an AI workflow for apparel sellers: start with an existing clothing photo, then generate on-model visuals with different models, poses, scenes, and views. This makes it useful when a product needs more visual variations but doesn't justify another shoot. Koozee also supports lingerie, swimwear, bodycon, and other fitted apparel categories.
How Koozee AI Try-On Works
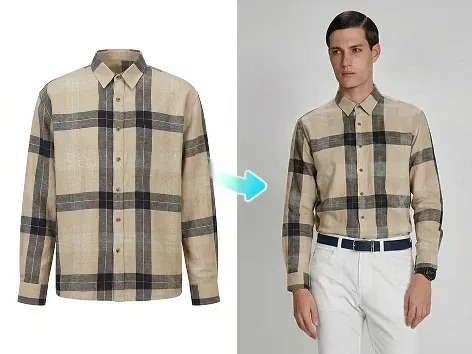
Koozee simplifies multi-pose catalog creation by turning a single product photo into various on-model angles without a photoshoot.
Step 1: Upload the clothing image: Start with a clear product photo, flat lay, or ghost mannequin shot.
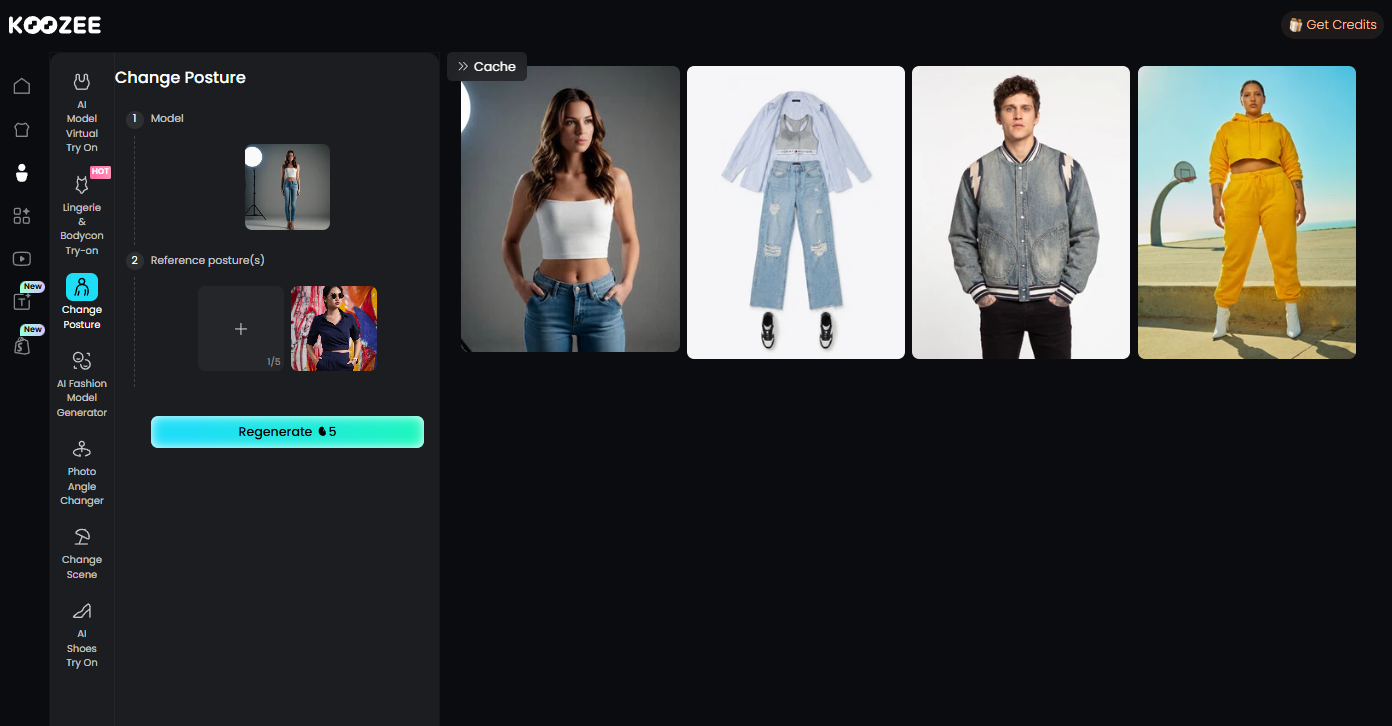
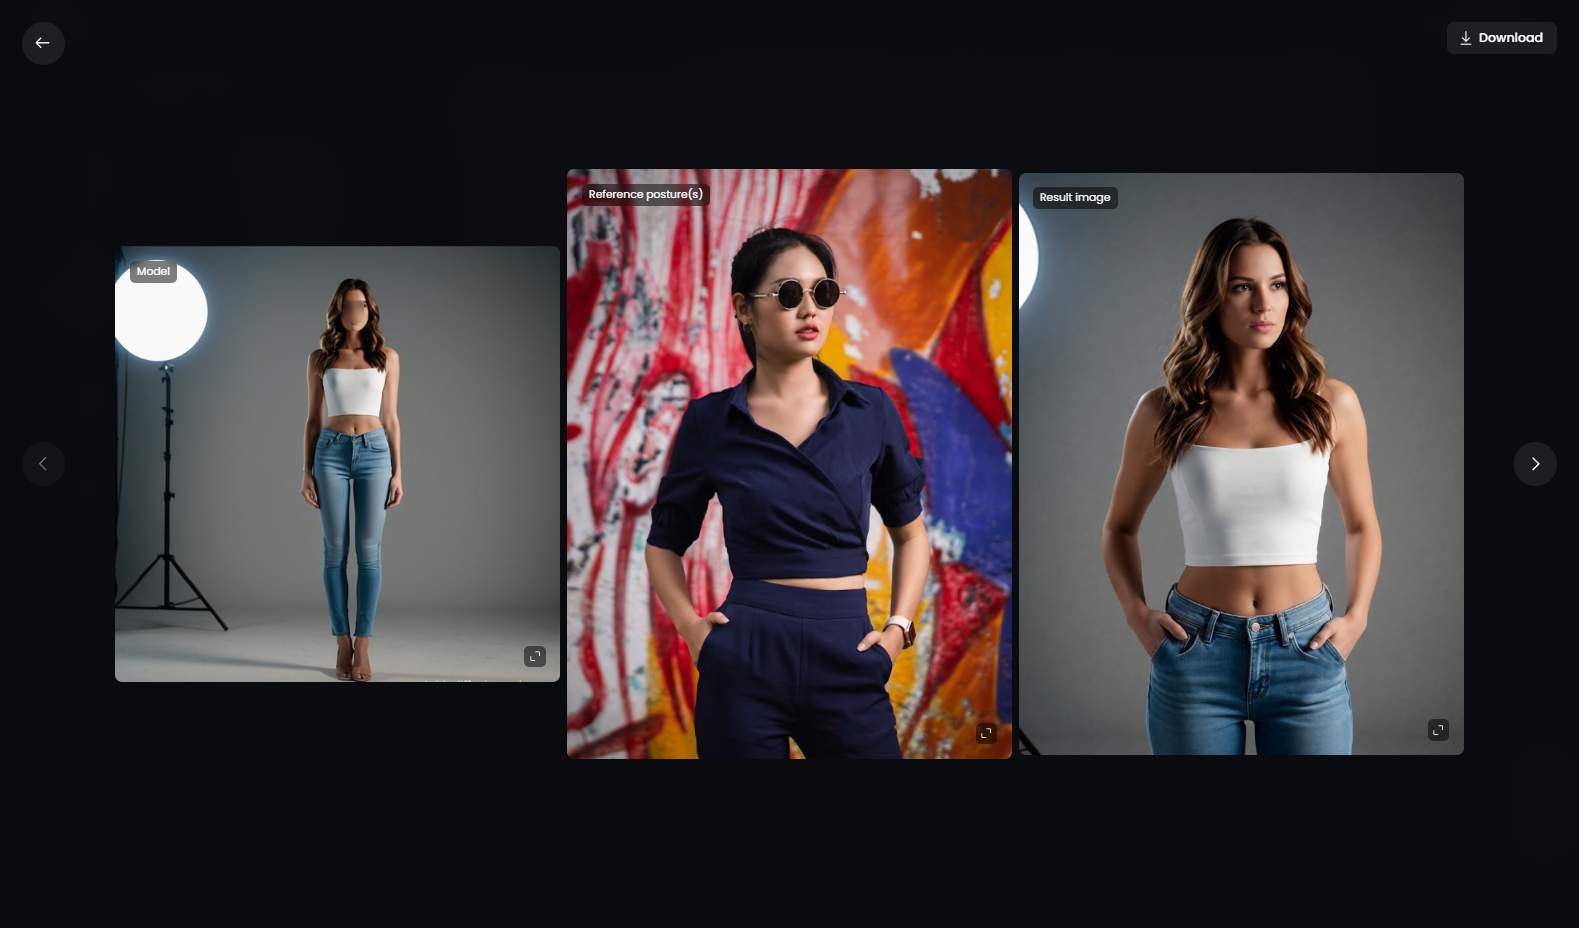
Step 2: Add a pose reference: To get a specific stance, upload a reference photo to dictate the exact pose you want to replicate, or choose from Koozee’s model library.
Step 3: Generate the try-on: Koozee renders your garment onto the model in the requested pose, preserving fit and fabric details.
Step 4: Change Posture & View: Instead of starting over for different angles, use the Change Posture and Change View features to instantly generate side profiles, seated poses, or back-detail shots from the exact same garment input.
Would you like to add a brief sentence at the end mentioning how these multi-pose images can then be turned into videos (like Lookbooks or Fit Checks) using Koozee's video tools?
When Koozee Makes Sense
Koozee is especially useful when:
A product needs more model or pose variations than the original shoot produced.
A brand wants consistent visuals across many SKUs.
New products need on-model images before another full shoot can be scheduled.
Lingerie, swimwear, or fitted apparel makes traditional model production more difficult.
Existing product photos need to be turned into additional listing, social, or campaign visuals.
Koozee is most useful when you already have product images but need more model, pose, or scene variations. It's to extend the visual assets you already have and reduce the need to reshoot every time a product needs another model, pose, or scene.
FAQ: Clothing Brand Photography Poses & Visuals
What poses work best for different clothing types?
Match the pose directly to the garment type to highlight its best visual features. Use the Three-Quarter Turn or Hands-on-Hips for fitted dresses and tops to define shape, a Seated Pose or Hand-in-Pocket for jeans and pants to show stretch, an Over-the-Shoulder look for back details, and a Walking Stride or Hands-Up Stretch to showcase activewear movement.
How should Amazon and Shopify clothing photos differ?
Posing strategy depends heavily on specific platform guidelines. Amazon strictly requires an upright standing model on a pure white background for main listing images, whereas Shopify gives you full creative freedom to incorporate lifestyle, seated, and motion poses across your gallery.
What are the easiest poses for beginner models?
The Lean, Hand-in-Pocket, and Three-Quarter Turn are the most straightforward options for inexperienced models. These stances give models natural physical anchors, keeping their hands relaxed and preventing stiff or awkward body language on camera.
How many poses should I include per product listing?
Aim to capture a consistent mix of 6 to 8 poses for each clothing SKU. This count thoroughly covers true front fit, side profiles, back details, fabric motion, and close-up craftsmanship without cluttering the listing page.
Can AI generate different clothing poses without a new photoshoot?
Yes, specialized visual platforms like Koozee can transform existing flat lays or product photos into multi-angle on-model visuals. Using features like Change Posture and Change View, sellers can instantly generate side profiles, seated stances, and rear angles without booking additional models or studio time.
You May Be Interested

14 Best Model Poses for Clothing Product Photography (2026)
How KOOZEE is Revolutionizing Everyday Fashion with AI Virtual Try-On

5 Best FASHN AI Alternatives for Clothing Product Photos in 2026
