How to Photograph Clothing to Sell Online (2026 Guide)
Learn how to take clothing photos with 3 proven ways. Improve your e-commerce sales with high-quality apparel displays!


Great product photography is the silent salesperson of any online boutique. When customers can’t touch the fabric, feel the texture, or try on the fit, your images have to do all the heavy lifting. However, capturing that perfect drape and true-to-life color takes more than just laying a shirt on the floor and snapping a quick picture with your smartphone.
Etsy research shows that 90% of buyers say photo quality is the most important factor in deciding to buy. Whether you’re launching a full-scale e-commerce brand, building a digital portfolio, or just looking to clear out your vintage wardrobe on a resale app, learning how to photograph clothes well is one of the most practical ways to build trust and make your listings easier for shoppers to evaluate.
This guide covers three proven methods for photographing clothes for sale, with step-by-step instructions for each — plus what to do when traditional photography can't keep up with your catalog volume.
Key Takeaways
Photos drive apparel sales: Buyers can't touch or try on your clothes online — your images are the product. Poor photos directly cost you conversions and increase return rates.
Fashion photography methods: Flat lay works for simple items and social content; ghost mannequin shows garment structure; on-model photos are the gold standard for fit and lifestyle appeal.
Lighting is everything: Soft, diffused light — natural or studio — is the single most important factor in accurate color, fabric detail, and professional-looking results.
Consistency beats perfection: Buyers scan entire catalogs. Consistent backgrounds, angles, and editing across all products build brand trust more effectively than one perfect hero shot surrounded by mismatched images.
AI-assisted photography: If your catalog grows faster than your photoshoot budget, AI visual production tools can generate on-model try-ons, ghost mannequin images, and product videos from existing product photos.
Essential Equipment: What You Need to Photograph Clothes for Sale
You don't need a $5,000 camera to get started. Many successful sellers begin with a smartphone and upgrade as their catalog grows. Here's the tiered breakdown:
Equipment | Basic Setup | Intermediate | Professional |
Camera | Smartphone (12MP+) | Entry-level DSLR or mirrorless (24MP+) | Full-frame mirrorless with 85mm–135mm lens |
Tripod | Basic phone tripod ($20) | Sturdy aluminum tripod with ball head | Heavy-duty studio tripod with geared head |
Lighting | Natural window light + white foam board reflector | 2 softbox lights + reflector | 3-point studio lighting (key, fill, backlight) |
Backdrop | White poster board or seamless paper roll | Collapsible backdrop stand + white/neutral paper | Motorized backdrop system with multiple colors |
Accessories | Lint roller, steamer, and clamps | Mannequin or dress form, styling clips | Ghost mannequin rig, remote shutter, color calibration card |
💡 Pro tip: If you're selling on Amazon, a pure white background (RGB 255,255,255) is a requirement for main images. Even if you shoot against an off-white wall, budget time for background removal in post-processing.
Method 1: Flat Lay Photography — Clean, Consistent, and Budget-Friendly
Flat lay is the most accessible way to photograph clothing for sale. You arrange the garment on a flat surface and shoot from directly above. It works especially well for t-shirts, folded sweaters, jeans, accessories, and simple items where fit isn't the primary selling point.
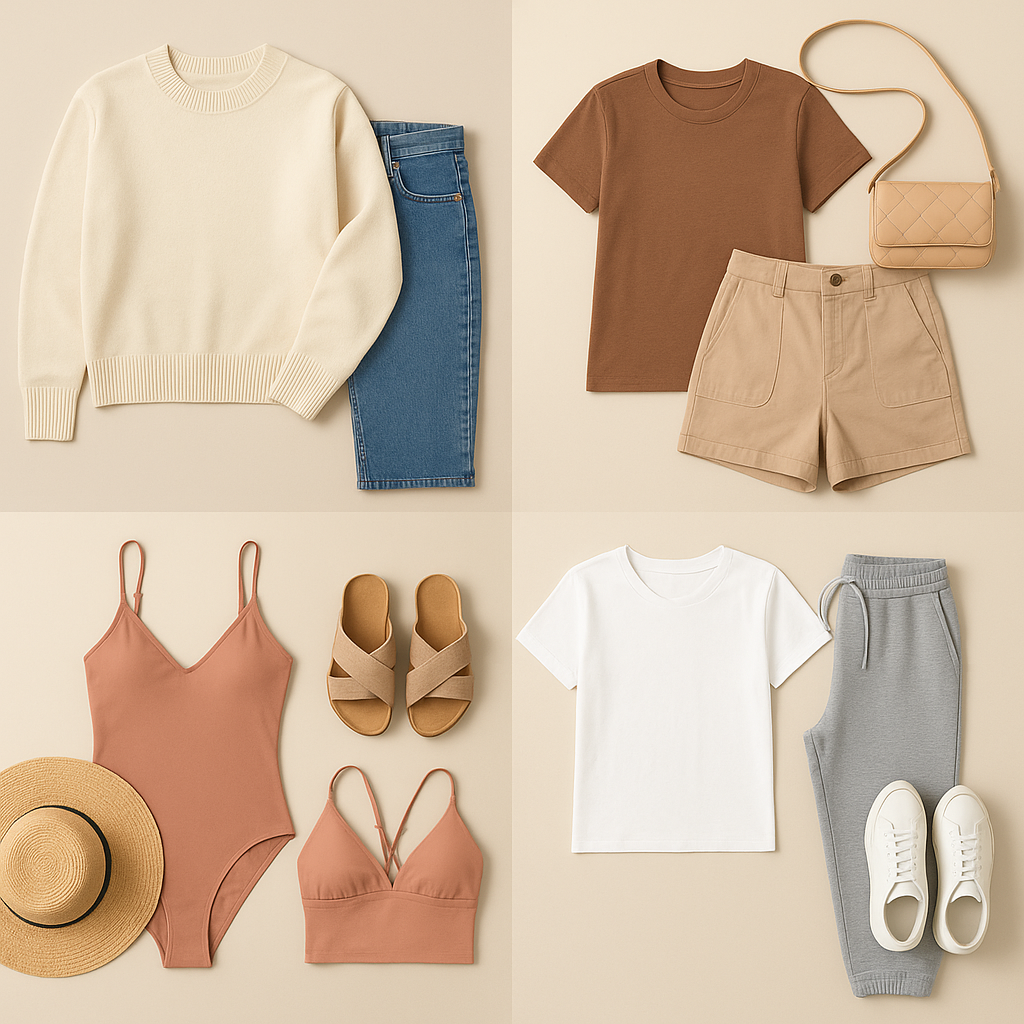
Step-by-Step Flat Lay Setup
Choose your surface: A clean hardwood floor, a large sheet of white paper, or a fabric backdrop stretched tight. Avoid textured surfaces that compete with the garment.
Position your tripod overhead: This is the trickiest part. Your camera must point straight down. Use a tripod with a horizontal arm, or secure your phone to an overhead mount. Test the framing before you place the clothing.
Steam and prep the garment: Every wrinkle shows in overhead light. Steam or iron thoroughly. Use a lint roller. Snip loose threads.
Style the garment intentionally: Don't just drop it on the floor. Fold sleeves neatly. Create gentle curves rather than sharp creases. For pants, show the waistband clearly. For dresses, fan out the skirt.
Add subtle props if they serve the product: A pair of sunglasses next to a summer dress. A coffee cup beside a cozy sweater. Keep props minimal — they should contextualize, not distract.
Shoot with even, diffused light: Position two softboxes at 45-degree angles on either side. If using natural light, shoot near a large window on an overcast day. Check for harsh shadows before shooting your full batch.
Capture multiple angles: Front full flat lay, detail close-up of fabric, tag/label close-up, any unique feature (embroidery, buttons, pattern alignment).
✅ Best for: Sellers with limited space and budget, social media content (Instagram, Pinterest), simple garments where structure isn't the key selling point, and building a consistent catalog look quickly.
Method 2: Ghost Mannequin Photography — Show Garment Structure Without a Model
Ghost mannequin, also called invisible mannequin or hollow man photography, shows how a garment hangs and fits on a body without a real model. The result is a clean, 3D product image that highlights cut, drape, and silhouette.
This is the standard for most professional apparel e-commerce. It's what you see on ASOS, Zara, and virtually most major clothing retailers' product pages.
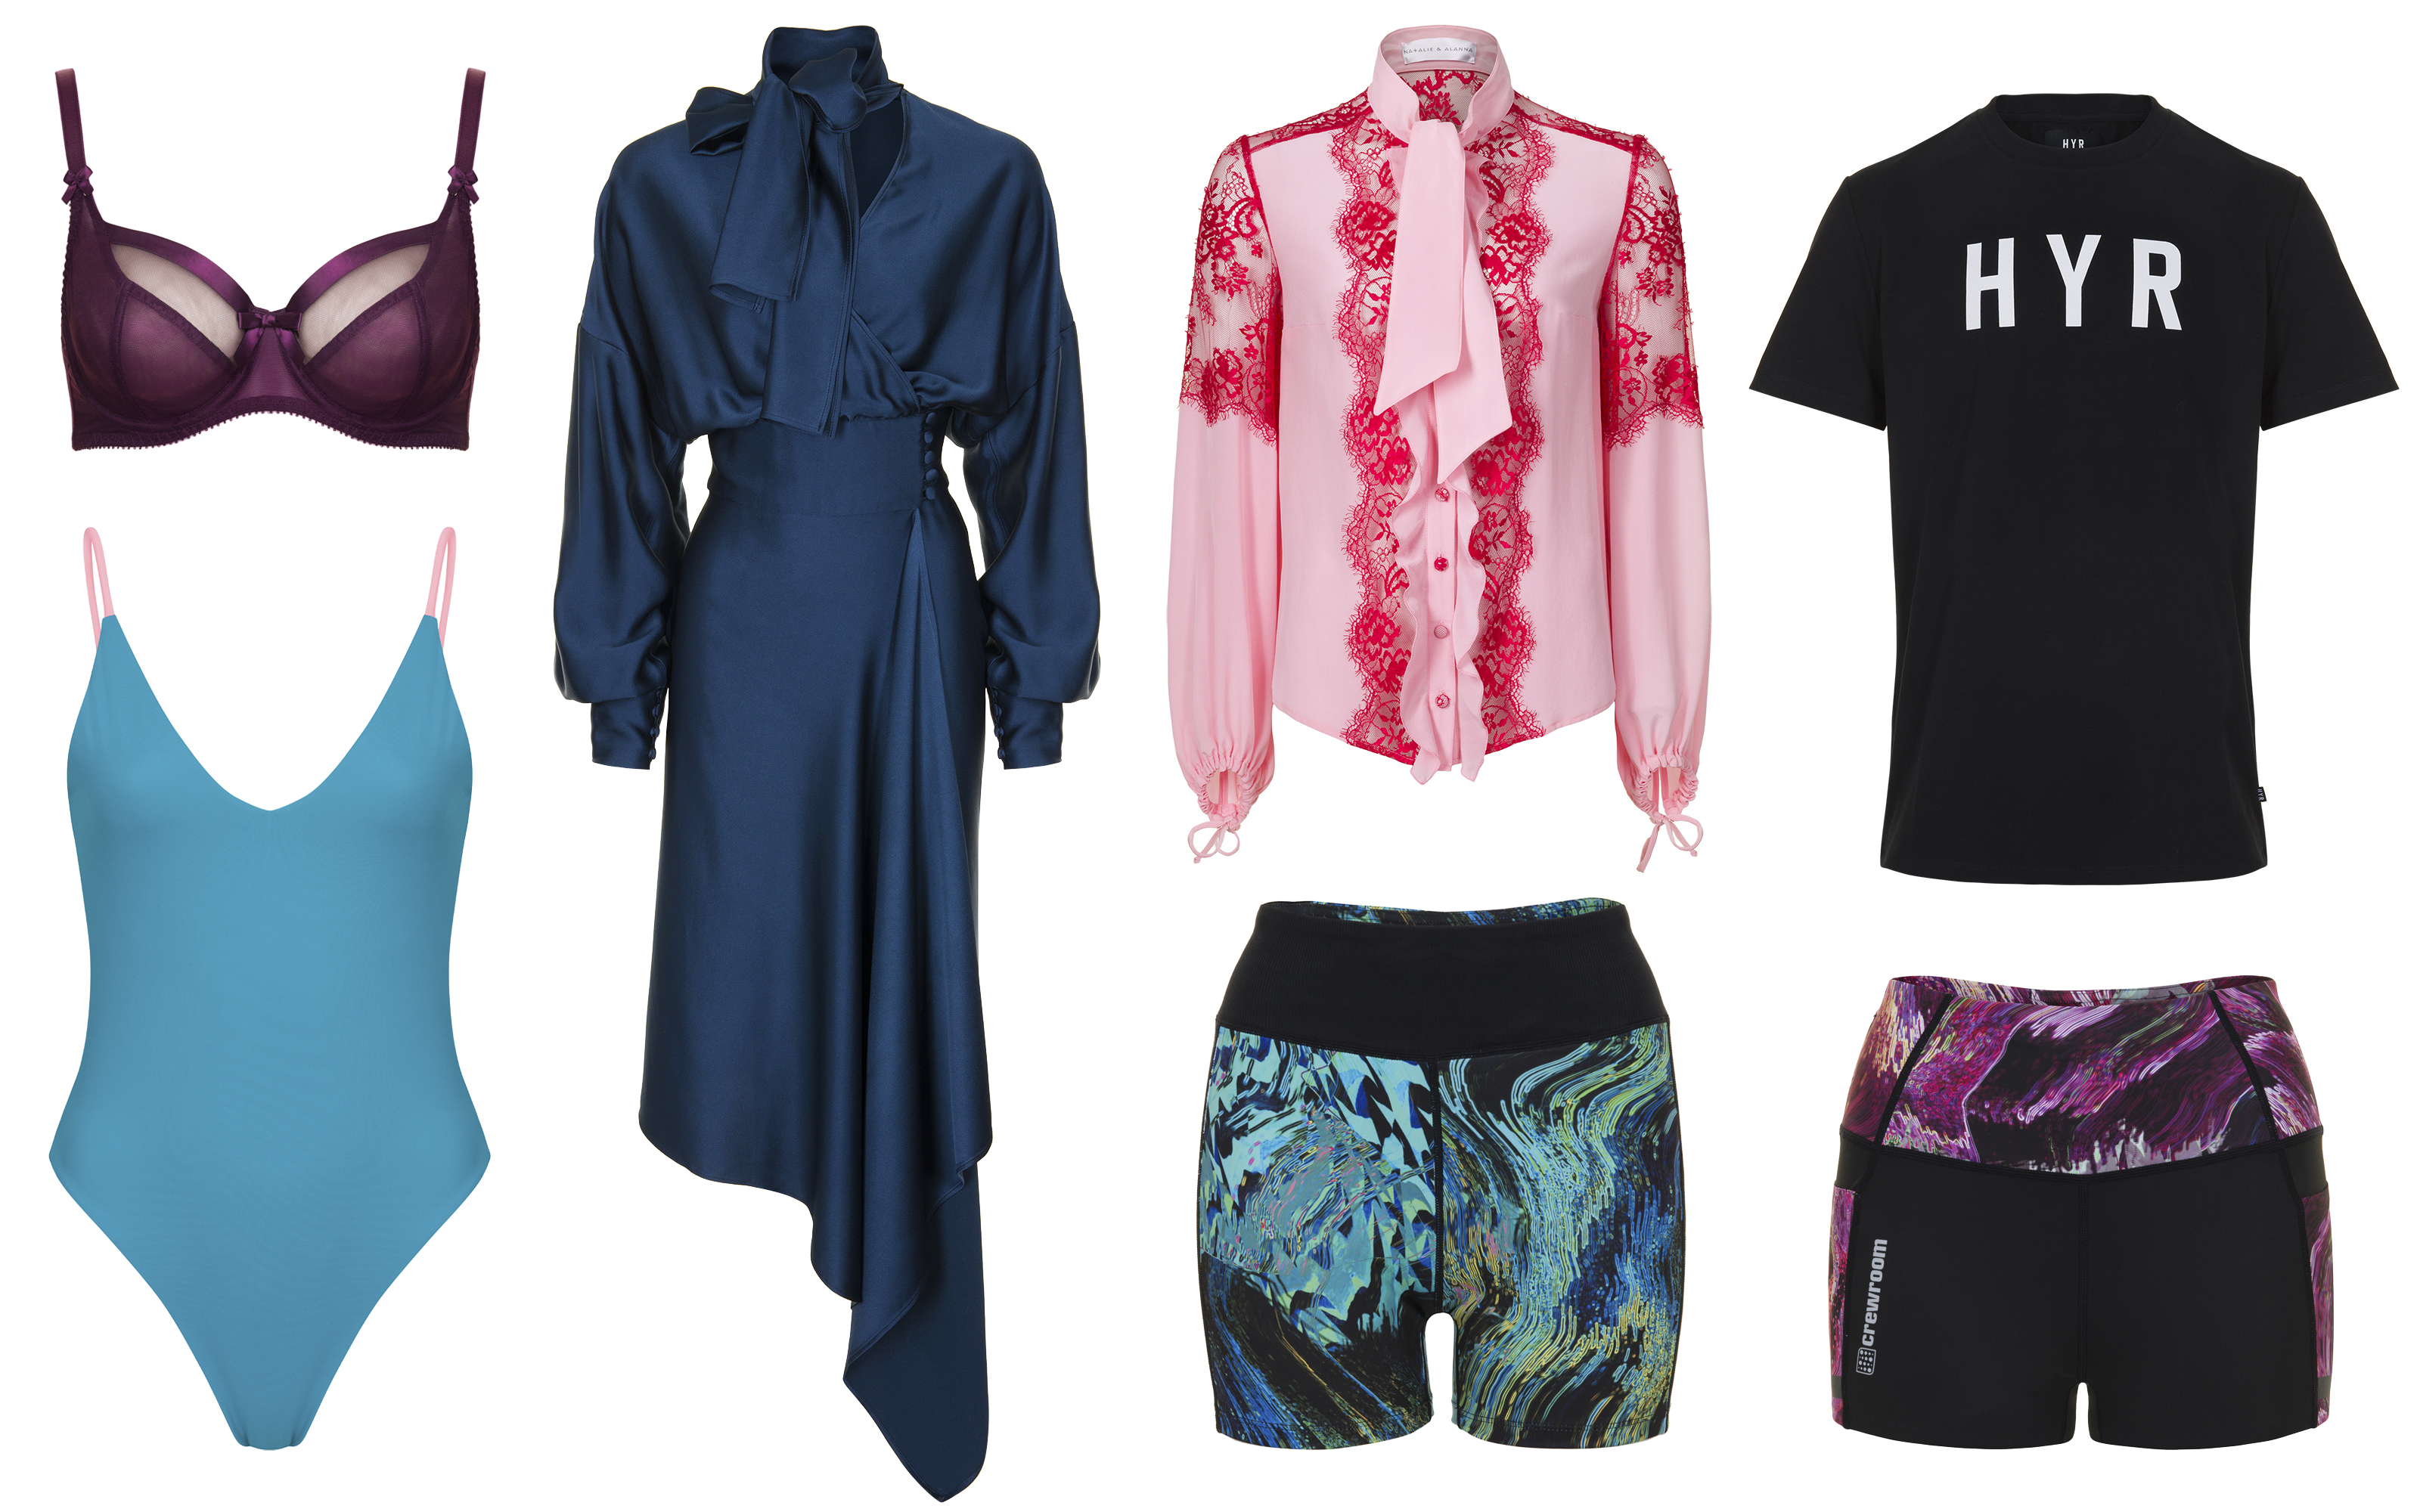
Step-by-Step Ghost Mannequin Setup
Dress the mannequin: Use a dress form or full-body mannequin.
Style the garment exactly as you want it to appear — smooth out wrinkles, align seams, adjust the neckline.Set your lighting for texture: Ghost mannequin photos need to show fabric texture and garment structure. Use a key light at 45 degrees and a fill light on the opposite side at a lower intensity. Add a backlight to separate the garment from the background.
Shoot the front view: Frame the garment squarely. Leave enough space around it for post-processing. Take the photo.
Shoot the inside back view: Remove the garment from the mannequin. Turn it inside out. Place it back on the mannequin and photograph the back area where the neck label, collar interior, and inside structure are visible.
Combine in post-processing: Use Photoshop or an editing tool to merge the front view with the inside-back view, masking out the mannequin. The result is a garment that appears to float with a visible interior neckline — the signature ghost mannequin look.
Repeat for back view and additional angles: Side view, detail shots of seams, buttons, cuffs, and hemline.
📌 Note: Ghost mannequin photography requires editing skills. If you're processing dozens of SKUs weekly, consider outsourcing the editing or using tools that automate the compositing. Many sellers use this method because it creates a clean, structured product view while staying more scalable than live-model photography. ✅ Best for: Shirts, jackets, dresses, blazers — any garment where cut and structure are selling points. Marketplace sellers who need professional product pages without the cost of models.
Method 3: On-Model Photography — The Gold Standard for Selling Clothing Online
Nothing sells clothing like seeing it on a real person. On-model photos answer the question every buyer silently asks: How will this look on me? On-model images consistently drive higher conversion rates than flat lay or mannequin shots alone — especially for fitted garments, dresses, and categories where fit is the top purchase concern.
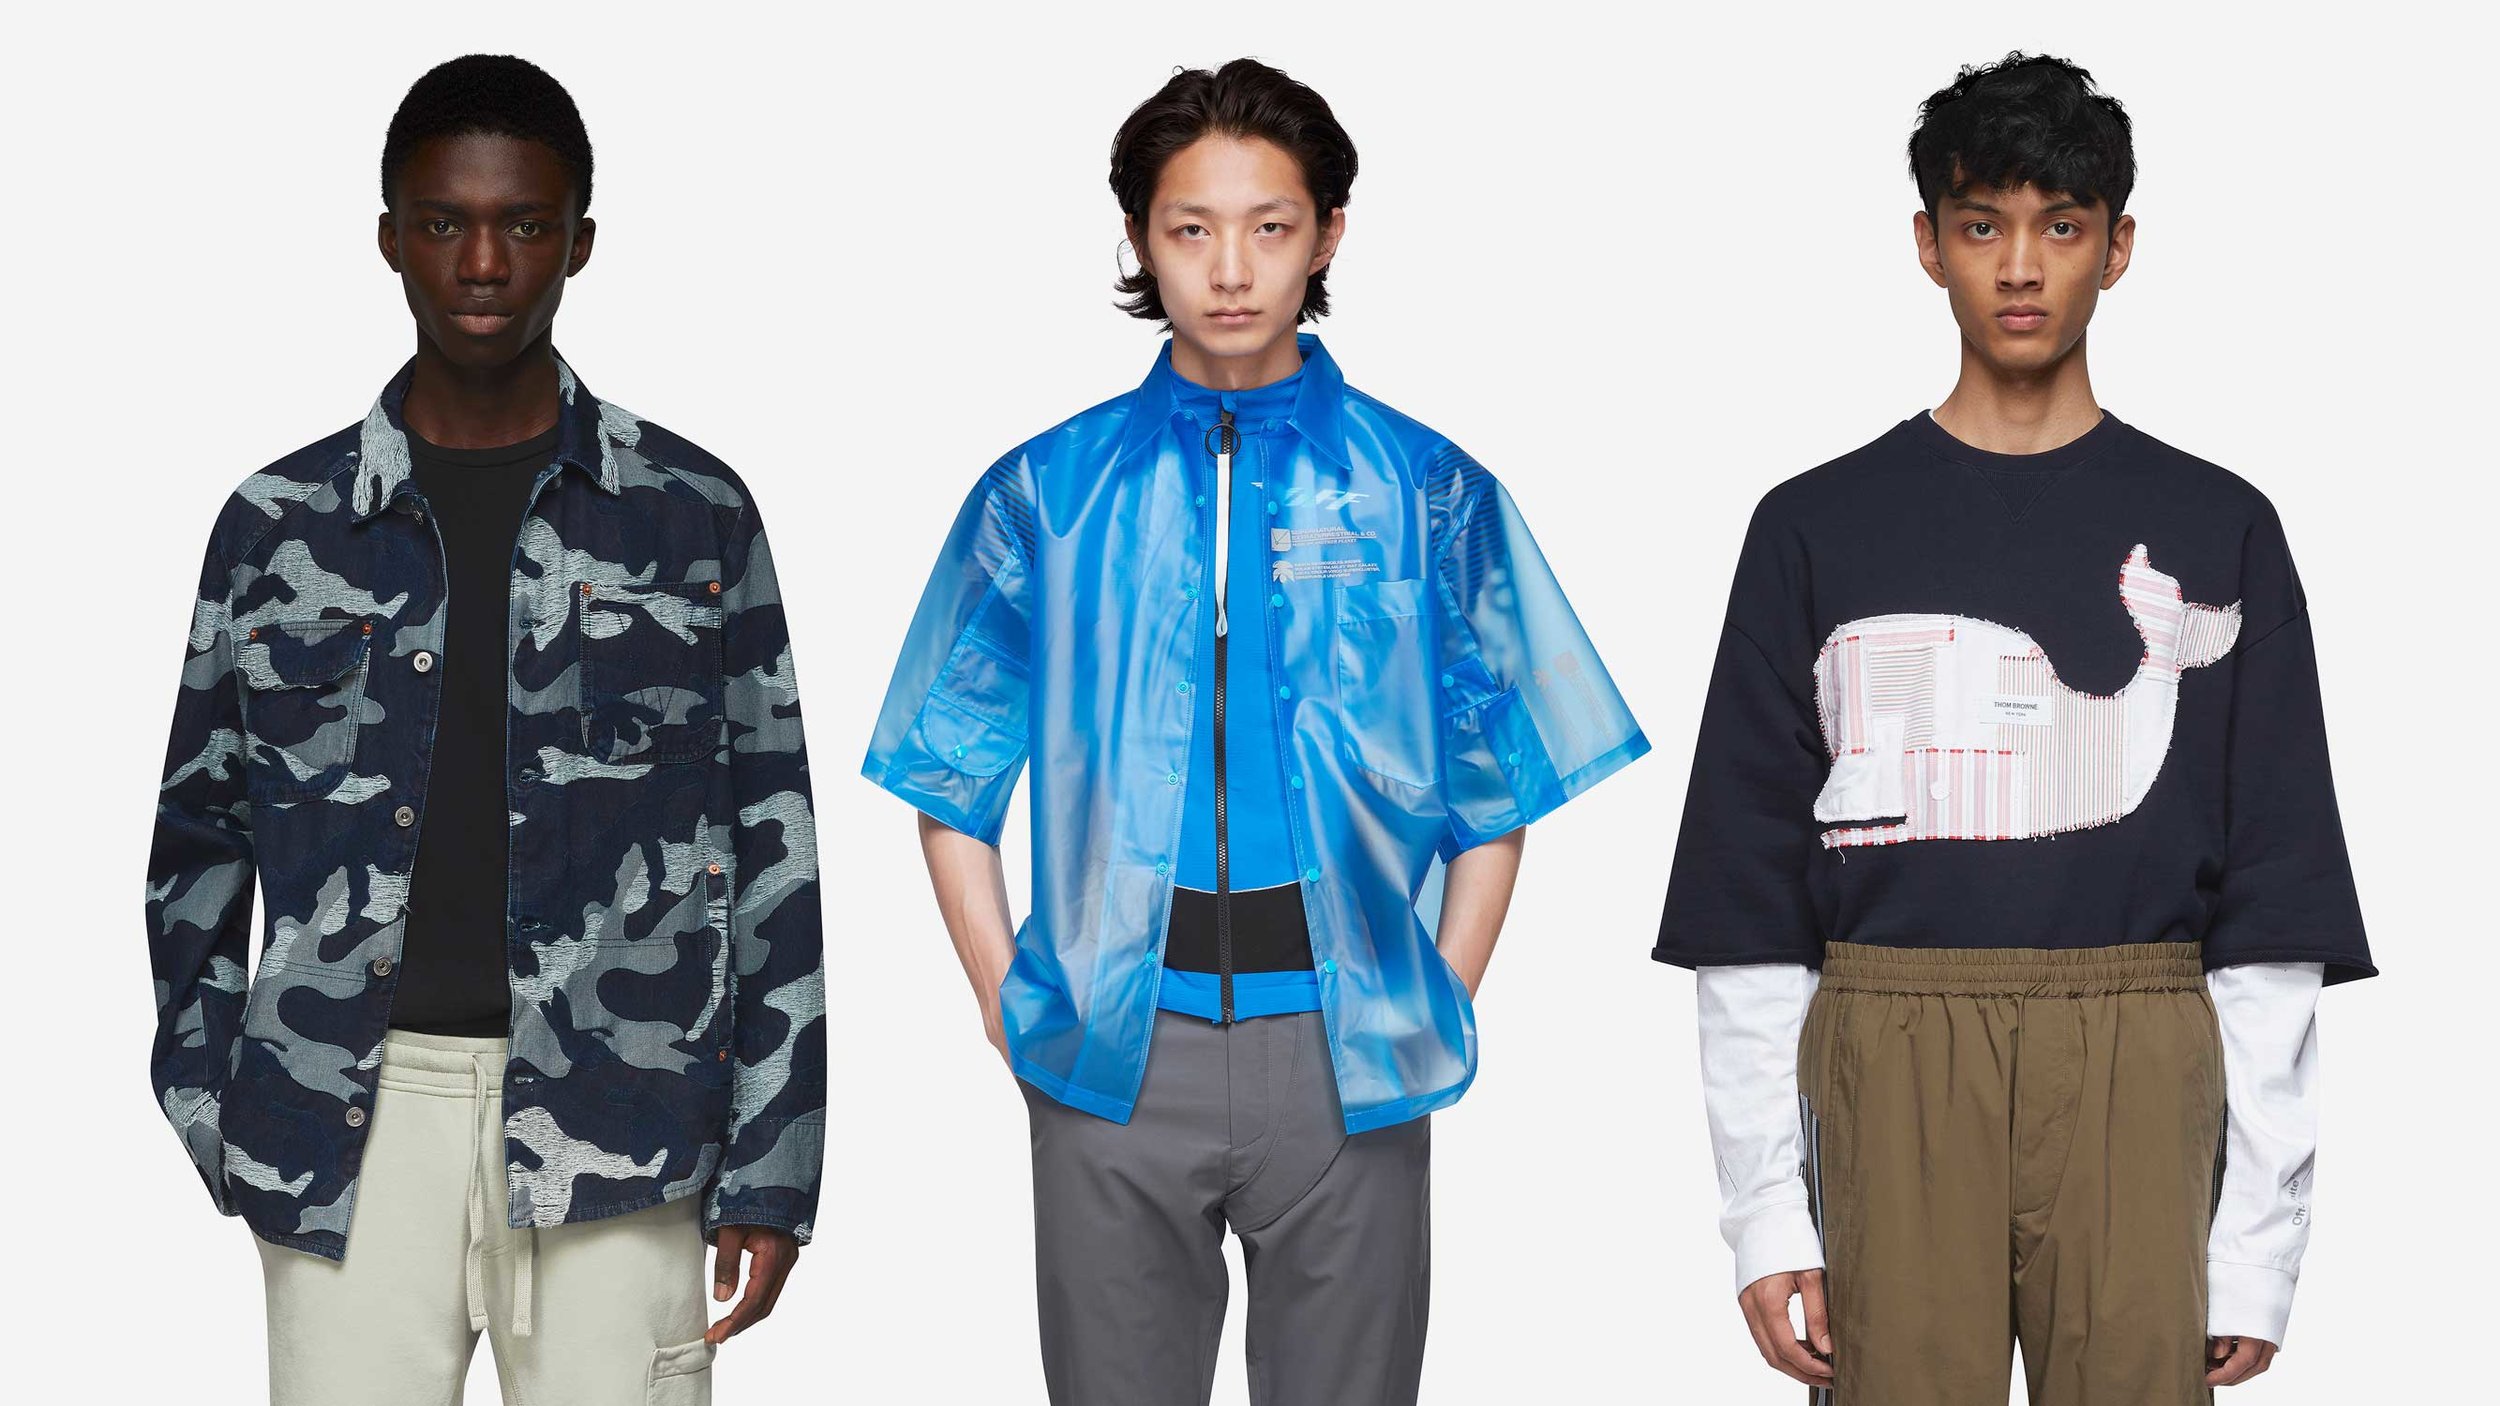
Step-by-Step On-Model Photography
Cast a model who reflects your target customer: You don't need a professional agency model. Someone who matches your customer's age range, body type, and style will create more authentic results than a runway model who doesn't connect with your buyers.
Choose your location and aesthetic: Studio shots (plain backdrop) keep the focus on the product. Lifestyle shots (urban streets, cafes, home settings) tell a story and inspire. Decide which fits your brand — or do both.
Direct natural poses: Stiff, unnatural poses kill credibility. Guide your model to move naturally — walking, adjusting a sleeve, looking away from the camera, laughing. Capture candid moments between posed shots.
Shoot multiple angles per outfit: Front full body, three-quarter front, side profile, back view, detail close-ups (fabric, collar, cuffs), and at least one lifestyle or candid shot.
Change lighting to match the mood: Studio shots need even, shadowless light (clamshell setup works well). Lifestyle shots benefit from natural light with a reflector to fill shadows.
Shoot in RAW format: You'll need flexibility in post-processing to correct exposure and color across a full shoot day. RAW gives you the latitude JPEG doesn't.
✅ Best for: Dresses, fitted tops, activewear, swimwear, and any garment where fit is the make-or-break factor. Brands that sell lifestyle and aspiration, not just products.
Bonus Method: Generate On-Model Visuals from Existing Clothing Photos
Traditional on-model photoshoots are expensive. You're paying for the model, the photographer, the studio or location, the editing, and — if your catalog changes frequently — you're doing this repeatedly. For apparel sellers with 50+ SKUs or seasonal collections, the cost adds up fast. That's where an apparel-focused AI visual production tool like Koozee can help with on-model photos. It is an AI visual production platform built specifically for apparel sellers. It turns your existing clothing product images into on-model try-ons, ghost mannequin images, flat lays, apparel videos, lookbooks, and listing page visuals — without booking a photographer or hiring a model.
When Photography Alone Isn't Enough
You're launching 30 new SKUs and can't book a photoshoot for each one.
You sell intimate apparel, swimwear, or body-con clothing — categories where model shoots are significantly more expensive and harder to arrange.
You need model variations (different body types, skin tones, poses) for the same product.
Your Shopify product images are decent, but you need to turn them into try-on visuals, videos, and listing assets without a full production team.
You want to test different scenes and backgrounds without reshooting.
How to Generate On-model Photos with Koozee (Step-by-step instructions):
Step 1. Go to Koozee's workspace and choose the Model section.
Step 2. Upload your clothes photo and the model.
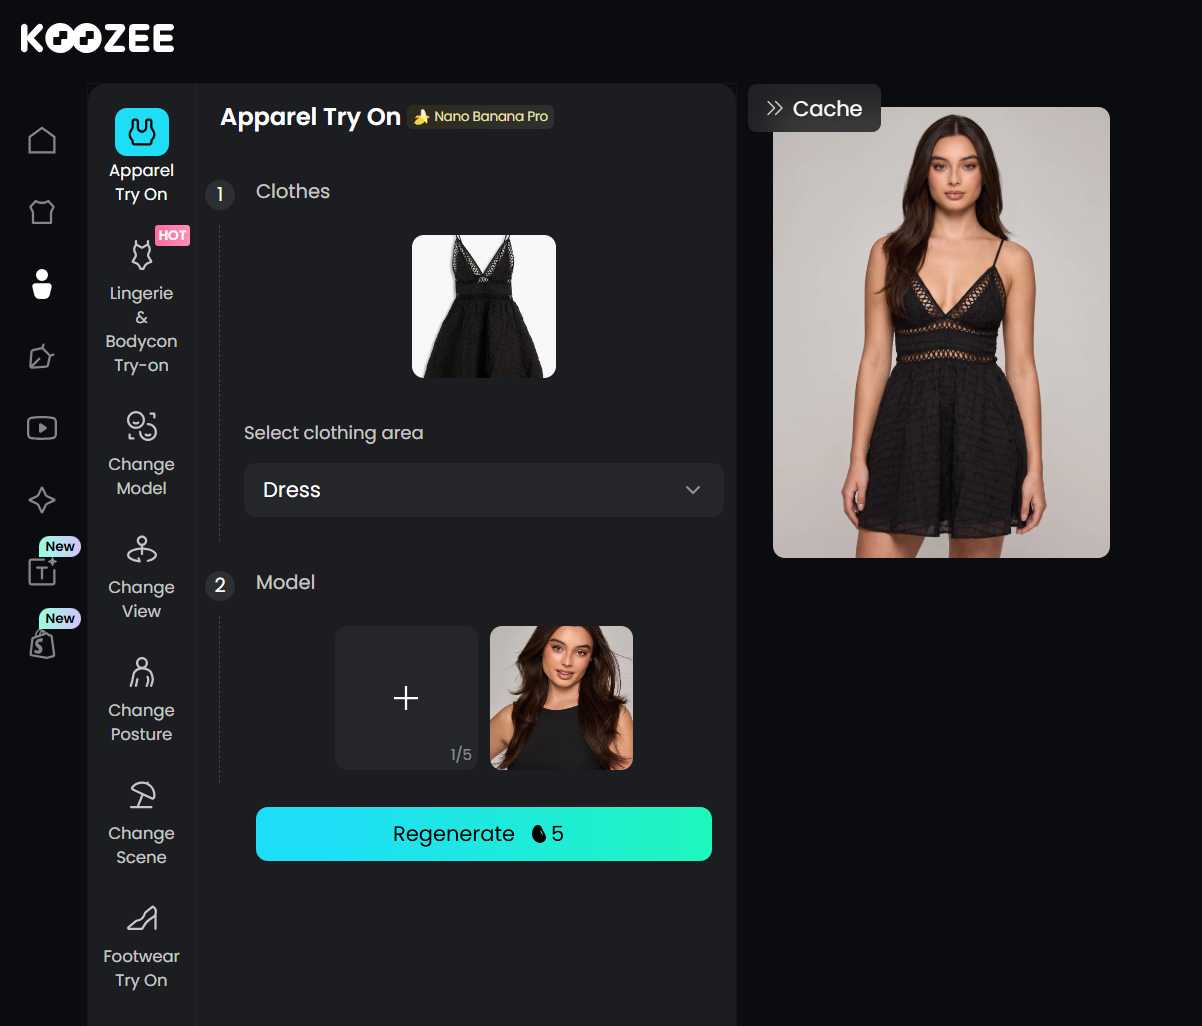
Step 3. Click "Generate" to start. It will take a few seconds to finish.
💡Pro Tip: Koozee can also help convert your flat lay photo into an outfit video. For Shopify sellers, Koozee can connect to the store, reuse existing product images, generate new visuals, preview the results, and manually publish approved assets back to Shopify — reducing the download, rename, and re-upload workflow.
✅ Best for: Supplement or alternative for catalog-scale needs — when you need dozens of product visuals fast, when model availability is a bottleneck, or when you want to test different visual styles before committing to a full photoshoot.
Lighting Setup: The Single Most Important Factor When You Photograph Clothing
You can shoot with a $300 phone or a $3,000 camera, but bad lighting ruins both. Good lighting makes even budget equipment produce listing-ready images.
Natural Light Setup
Best time: Morning or late afternoon. Midday sun casts harsh shadows. Overcast days are actually ideal — clouds act as a giant diffuser.
Set up: Place your shooting area perpendicular to a large window. Use a white foam board on the opposite side as a reflector to bounce light back onto the shadow side of the garment.
Avoid: Direct sunlight hitting the garment. It creates blown-out highlights and inaccurately bright colors.
Studio Light Setup (Recommended for Consistency)
Two-light flat setup (for flat lay and ghost mannequin): Place two softboxes at 45-degree angles, an equal distance from the garment. This eliminates shadows and creates even illumination.
Three-point setup (for on-model): Key light at 45 degrees (main illumination), fill light on the opposite side at 50–70% intensity (softens shadows), backlight behind and above the subject (separates from background).
Color temperature: Set all lights to the same color temperature — typically 5000K–5500K (daylight). Mismatched temperatures create color casts that are a nightmare to fix in editing.
💡 Pro tip: Buy a gray card ($10–15) and photograph it under your lighting setup before each shoot. Use it to set white balance in post-processing. This single habit eliminates most color accuracy issues that lead to returns.
Post-Processing: Editing Your Photos to Look Listing-Ready
Editing is not about making clothes look better than they are — it's about making photos look like what the buyer will actually receive. Accurate editing builds trust. Over-editing can create unrealistic expectations and increase the risk of returns.
Essential Edits (Every Photo)
White balance correction: Use the gray card reference photo to set accurate white balance. This is the #1 step for color accuracy.
Exposure adjustment: Brighten underexposed images. Recover highlights on white garments. Aim for a clean, bright look without blowing out detail.
Crop and straighten: Every product photo should use consistent framing. Align horizons, center the garment, and crop to the same aspect ratio across your catalog.
Background cleanup: Remove dust spots, scuffs on the backdrop, and distractions. If your background isn't pure white, use background removal tools to replace it.
Spot removal: Remove stray lint, threads, or minor blemishes that don't reflect the actual product.
Consistency Is the Goal
When a buyer browses your catalog, the photos should feel like they came from the same world — same brightness, same color temperature, same framing. This is more important than making any single photo perfect.
📌 Note: File naming matters. Use a consistent format:[SKU]-[angle]-[color].jpg(e.g.,TS001-front-white.jpg). Image size should balance quality and load speed — 2000px on the longest side is a safe standard for most platforms.
Common Mistakes to Avoid When Photographing Clothing to Sell Online
It's inevitable to make mistakes when taking photos of clothes, even experienced sellers fall into these traps. Check your current catalog against this list:
Mistake | Why It Hurts | Quick Fix |
Inconsistent lighting across products | Makes your catalog look amateur and untrustworthy | Lock in one lighting setup and use it for every shoot |
Wrong colors due to poor white balance | #1 cause of "item not as described" returns | Use a gray card and set white balance in editing |
Cluttered or distracting backgrounds | Pulls attention away from the product | Shoot against clean white, neutral, or context-appropriate backgrounds |
One photo per product | Buyers can't assess fit, fabric, or details from a single angle | Capture a minimum of 5 angles: front, back, side, detail, lifestyle |
Wrinkled or poorly prepped garments | Signals low quality — buyers assume the product matches the presentation | Steam/iron everything, no exceptions |
Over-filtering or heavy editing | Creates unrealistic expectations that lead to returns | Edit for accuracy, not aesthetic — the buyer should receive what they see |
Final Words
Clothing photography is not about choosing one perfect method. Flat lays help show product details, ghost mannequin images show structure, and on-model photos show fit, proportion, and styling context.
For a small catalog, a simple lighting setup and consistent flat lay or mannequin workflow may be enough. As your catalog grows, you can combine traditional photography with AI visual production like Koozee to create more model variations, listing visuals, product videos, and Shopify-ready assets without booking a new shoot for every SKU.
FAQs
What's the best camera for photographing clothes for sale?
Most cameras can shoot great photos of clothing. You don't need a professional camera to start. A modern smartphone with good natural lighting produces listing-quality images. Upgrade to a DSLR or mirrorless camera when consistency, low-light performance, and RAW flexibility become important for your catalog scale.
How many photos should I take per clothing product?
At minimum, five: front, back, side, a fabric/texture detail close-up, and one lifestyle or contextual shot. For higher-priced items ($80+), aim for seven to ten photos covering every angle, every detail, and at least two lifestyle images.
Should I use a model or a mannequin for clothing photography?
It depends on the garment and your budget. On-model photography converts best for fitted garments, dresses, and lifestyle brands. Ghost mannequin works well for shirts, jackets, and structured pieces where cut and silhouette are the focus.
How do I photograph clothes with a white background?
Shoot against a white seamless paper roll or fabric backdrop. Light the background separately from the garment — use two background lights pointed at the backdrop to blow it out to pure white. For Amazon, main images generally need a pure white background with RGB values of 255,255,255.
How can I get model photos without hiring a photographer?
AI visual production tools like Koozee can generate on-model try-on photos from your existing flat garment images. This is a practical alternative when traditional photoshoots are too expensive, too slow, or impractical — especially for categories like lingerie, swimwear, and fast-turnaround seasonal collections.
Does clothing photography really affect return rates?
Yes. Inaccurate colors, misleading fit, and insufficient detail are consistently the top reasons for clothing returns. High-quality, accurate, multi-angle photography reduces the gap between buyer's expectation and reality — directly lowering return rates.
What's the easiest way to photograph clothes for an online store if I'm just starting?
The easiest method for beginners is flat lay. Place your garments on a clean, white background on the floor next to a large window. Shoot from directly above using natural daylight for professional, shadow-free results without expensive gear.